Stay informed
Subscribe to our newsletter if you'd like to stay informed about Shoutem Extensions and Shoutem UI Toolkit.
Shoutem Cloud Storage is a CMS solution for mobile apps. We made the @shoutem/redux-io package to simplify the communication with Shoutem CMS. Define a data schema to describe your data model, do this in your Restaurant extension directory:
$ shoutem schema add Restaurants
Schema `Restaurants` is created in file `server/data-schemas/Restaurants.json`!
File `extension.json` was modified.
The CLI just created a data-schemas folder inside the server folder and put Restaurants.json in it, which contains the following:
#file: server/data-schemas/Restaurants.json
{
  "title": "Restaurants",
  "properties": {
    "name": {
      "format": "single-line",
      "title": "Name",
      "type": "string",
      "displayPriority": 1
    },
  },
  "titleProperty": "name",
  "type": "object"
}
We’re using the server folder because data schemas are not part of the app code, but rather the server side of an extension. Data schemas are nothing more than Shoutem-flavored JSON Schemas. They describe the data being stored on Shoutem Cloud Storage.
All fields are explained in the data schema reference. This schema is exported in extension.json:
#file: extension.json
{
  "name": "restaurants",
  "version": "0.0.1",
  "platform": "1.0.*",
  "title": "Restaurants",
  "description": "A restaurants extension.",
  "screens": [{
    "name": "List"
  }, {
    "name": "Details"
  }],
  "shortcuts": [{
    "name": "Restaurants",
    "title": "Restaurants",
    "description": "Allow users to browse through list of restaurants"
    "screen": "@.List",
  }],
  "dataSchemas": [{
    "name": "Restaurants",
    "path": "server/data-schemas/Restaurants.json"
  }]
}
Currently, your schema only has the name property, which we’ll use for each restaurants name. Let’s add additional properties which we want to have for each restaurant, such as: address, description, website url, image and mail.
#file: server/data-schemas/Restaurants.json
{
  "title": "Restaurant",
  "properties": {
    "name": {
      "format": "single-line",
      "title": "Restaurant's name",
      "type": "string",
      "displayPriority": 1
    },
    "address": {
      "format": "single-line",
      "title": "Address",
      "type": "string",
      "displayPriority": 2
    },
    "description": {
      "format": "multi-line",
      "title": "Description",
      "type": "string",
      "displayPriority": 3
    },
    "url": {
      "format": "uri",
      "title": "Website",
      "type": "string",
      "displayPriority": 4
    },
    "image": {
      "format": "attachment",
      "title": "Image",
      "type": "object",
      "referencedSchema": "shoutem.core.image-attachments",
      "displayPriority": 5
    },
    "mail": {
      "format": "single-line",
      "title": "E-mail",
      "type": "string",
      "displayPriority": 6
    }
  },
  "titleProperty": "name",
  "type": "object"
}
To enter data for your schema, you need to use settings page. Basically, the settings pages are web pages on the Builder. Extension developers write them to enable app owners to manage their extensions.
Shoutem prepared a CMS settings page inside the shoutem.cms extension that you can use to manage data for your schema on the Shoutem Cloud. Reference that settings page in the Restaurants shortcut and pass it the Restaurants schema. The page will appear when an app owner selects the Restaurants shortcut on the Builder:
#file: extension.json
{
  "name": "restaurants",
  "version": "0.0.1",
  "platform": "1.0.*",
  "title": "Restaurants",
  "description": "List of restaurants",
  "screens": [{
    "name": "List"
  }, {
    "name": "Details"
  }],
  "shortcuts": [{
    "name": "Restaurants",
    "title": "Restaurants",
    "description": "Allow users to browse through list of restaurants",
    "screen": "@.List",
    "adminPages": [{
      "page": "shoutem.cms.CmsPage",
      "title": "Content",
      "parameters": {
        "schema": "@.Restaurants"
      }
    }]
  }],
  "dataSchemas": [{
    "name": "Restaurants",
    "path": "server/data-schemas/Restaurants.json"
  }]
}
Let’s upload the extension now, since we want to customize the web interface and the extension server side:
$ shoutem push
Uploading `Restaurants` extension to Shoutem...
Success!
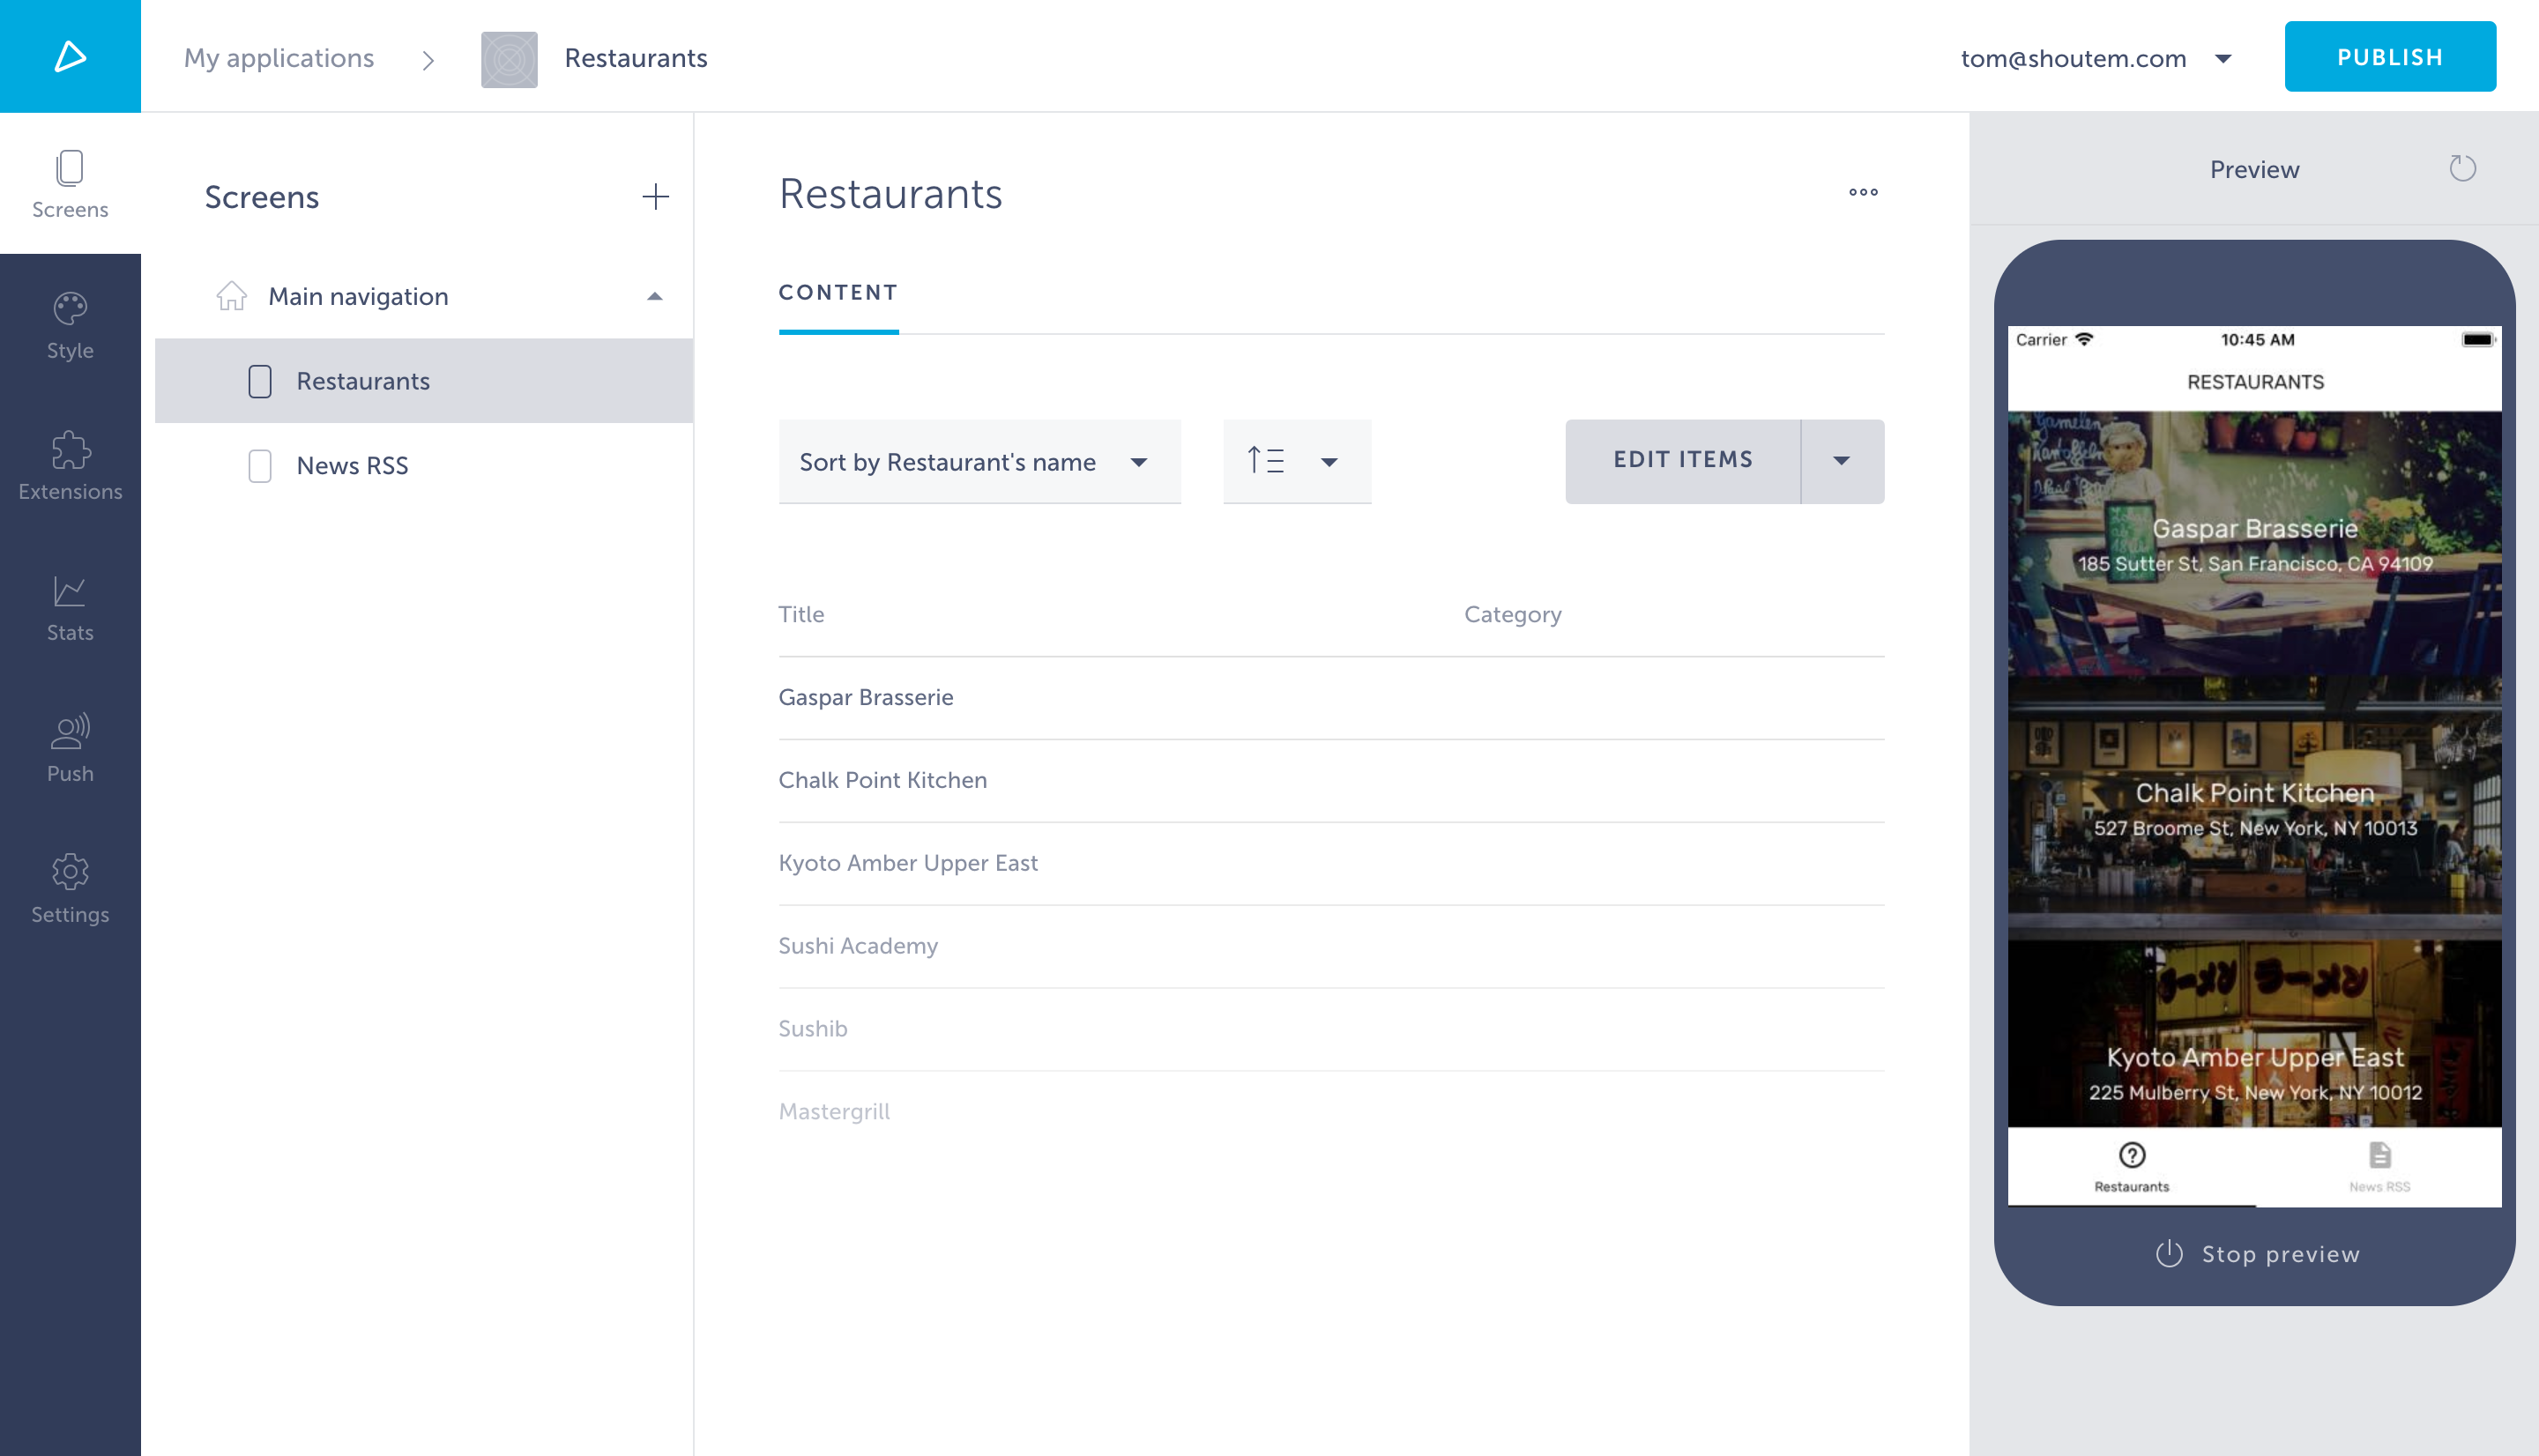
Go to the Builder, open your app and select Restaurants under Main navigation to see the Shoutem CMS page.
![]()
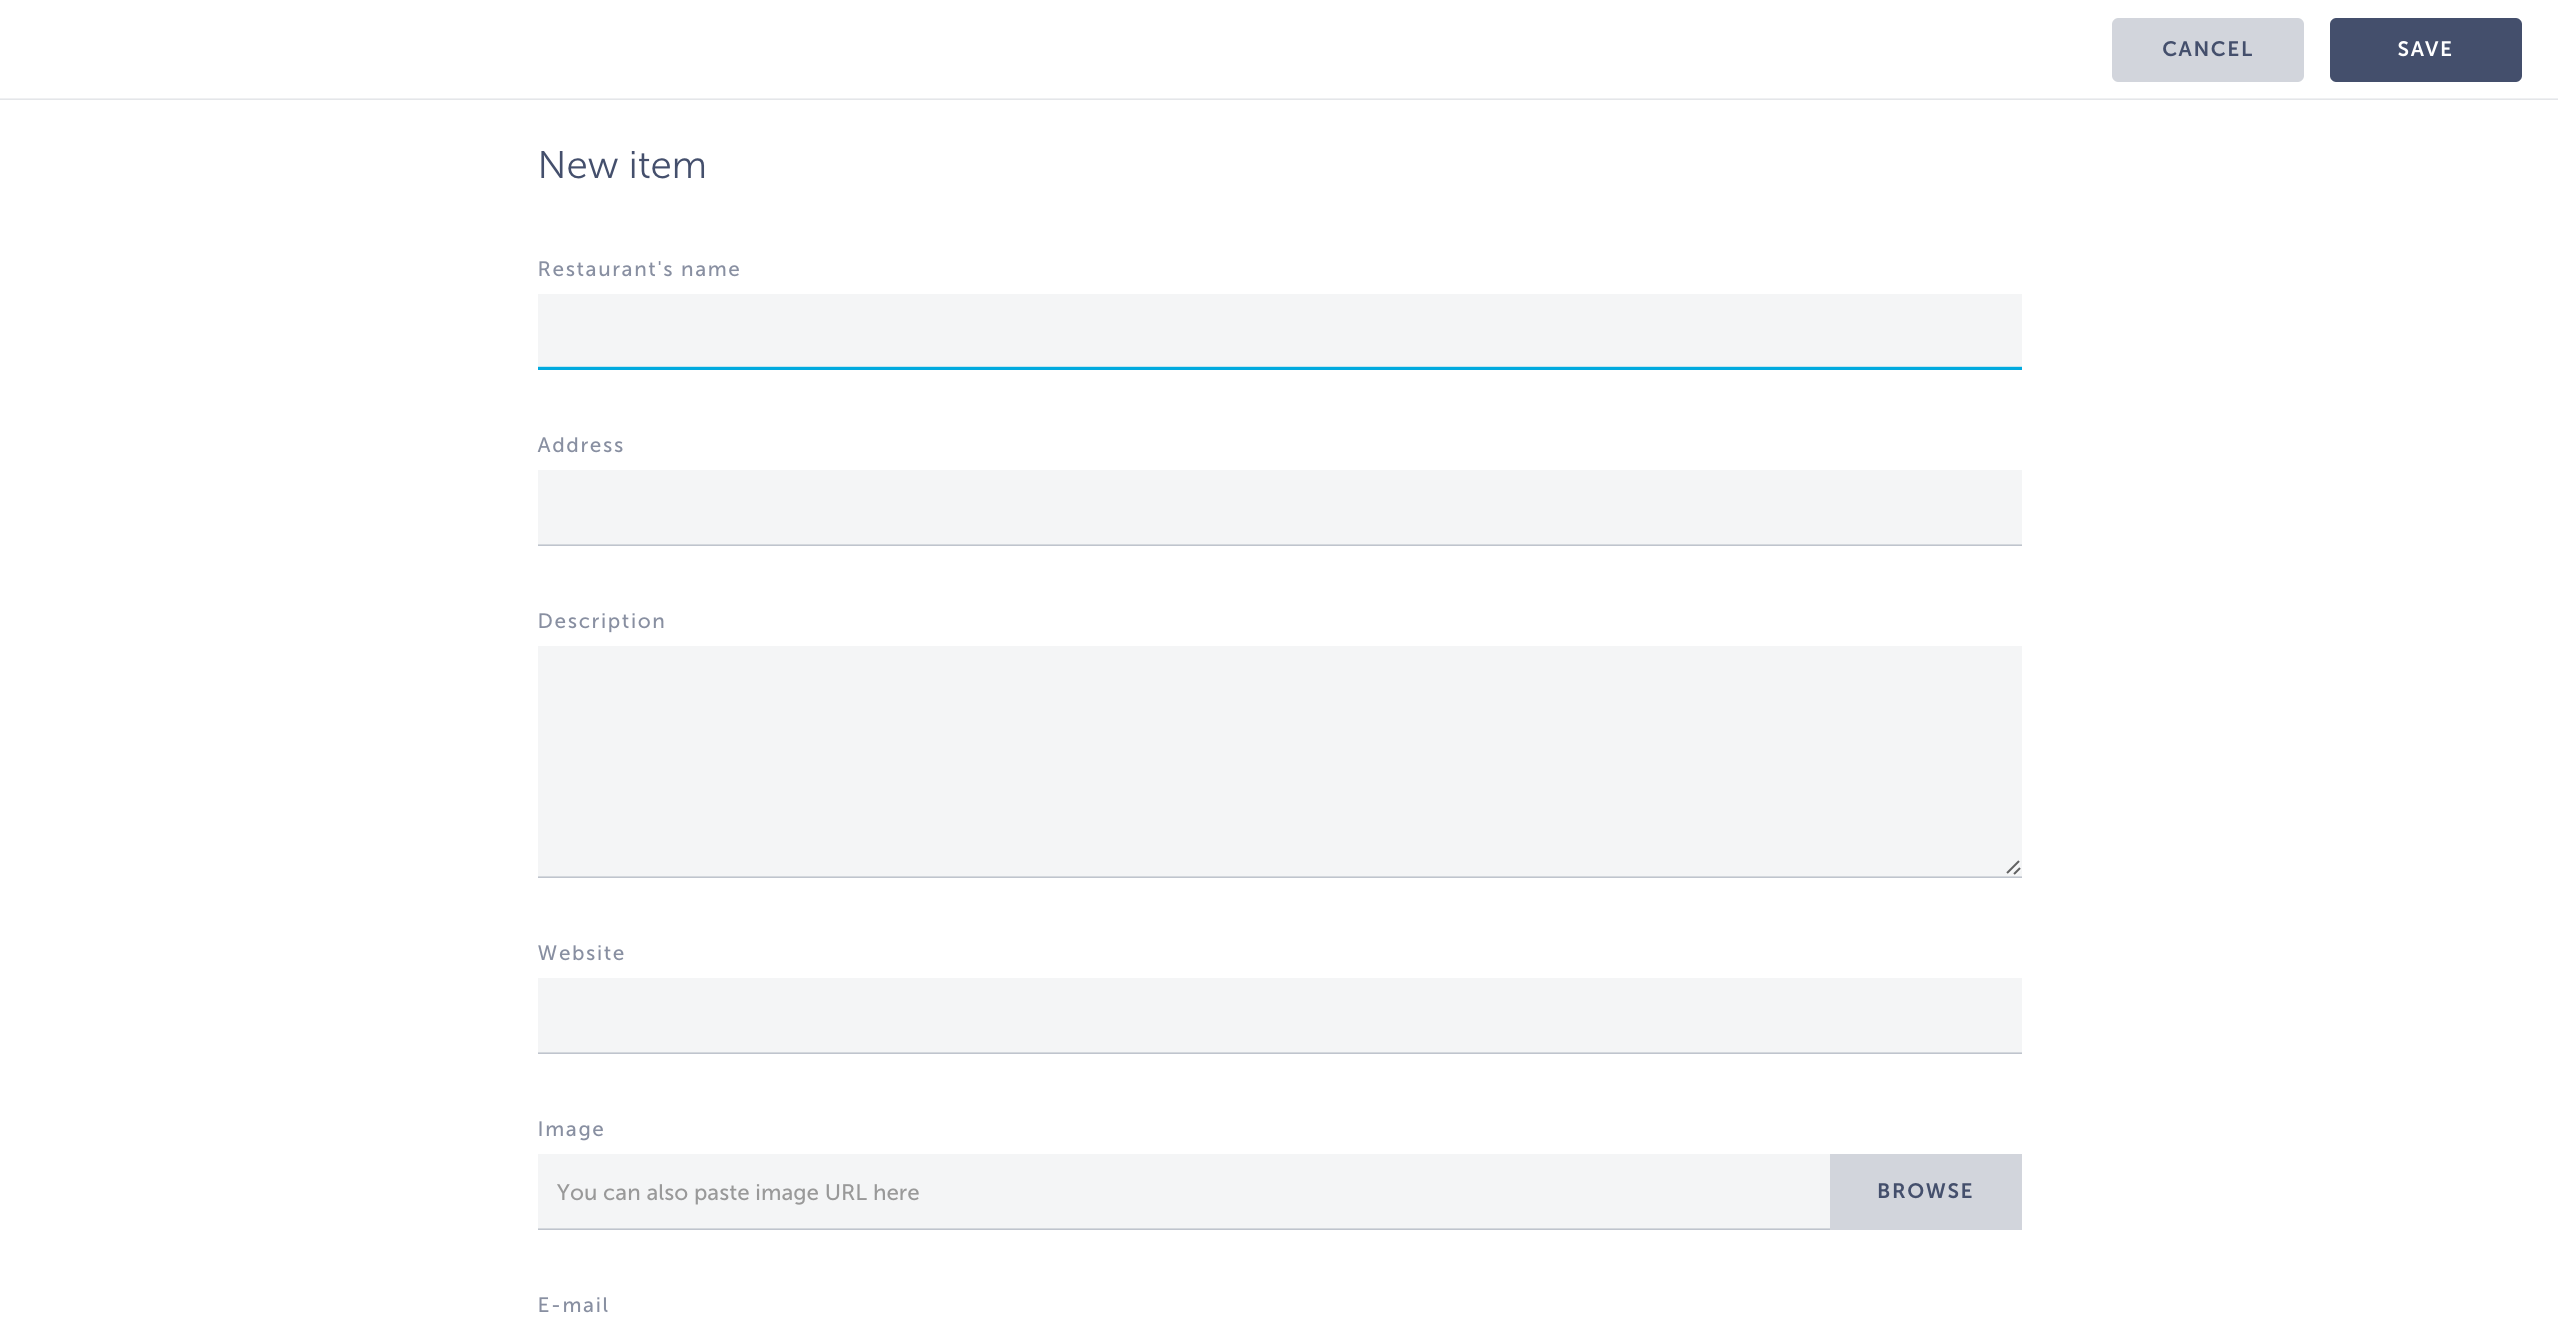
Click on Create Items to start adding content. This will open a modal that contains the CMS interface, where you can manage the content for your extension. Apps that get content from the Shoutem CMS will immediately show new content once you edit or add it.
![]()
Click on Add item. This will open a modal for inserting data for the Restaurants model, which you defined with your data schema.
Add at least one restaurant. Now you can see the data in the CMS settings page of your Restaurants extension:
Although you’ve added some restaurants in the Builder, your extension is still coded to use static data from the assets folder you set up earlier in the tutorial series. Let’s change that and start fetching the data from Shoutem Cloud Storage using the @shoutem/redux-io package.