Stay informed
Subscribe to our newsletter if you'd like to stay informed about Shoutem Extensions and Shoutem UI Toolkit.
In this tutorial, we’ll show you how to create HTML Settings pages for both shortcut settings and extension settings pages. HTML settings pages are useful to developers who have an existing dashboard they want to implement into the Builder without having to re-write it into React. For example if they have an existing AngularJS based dashboard.
First, let’s make an extension to work with. We’ll make a simple Hello World! example so we can easily cover the basic concepts.
$ shoutem init html-hello-world
Enter information about your extension. Press `return` to accept (default) values.
? Title HTML Hello World
? Version 0.0.1
? Description Learning HTML settings pages.
...
Extension initialized.
We need to add a screen with a shortcut, so we have a shortcut to add settings pages to. Locate to the extension folder:
cd tom.html-hello-world
And add the screen:
$ shoutem screen add Hello
? Screen name: Hello
? Create a shortcut (so that screen can be added through the Builder)? Yes
? Shortcut name: Hello
? Shortcut title: Hello
? Shortcut description: A shortcut for Hello
...
Success
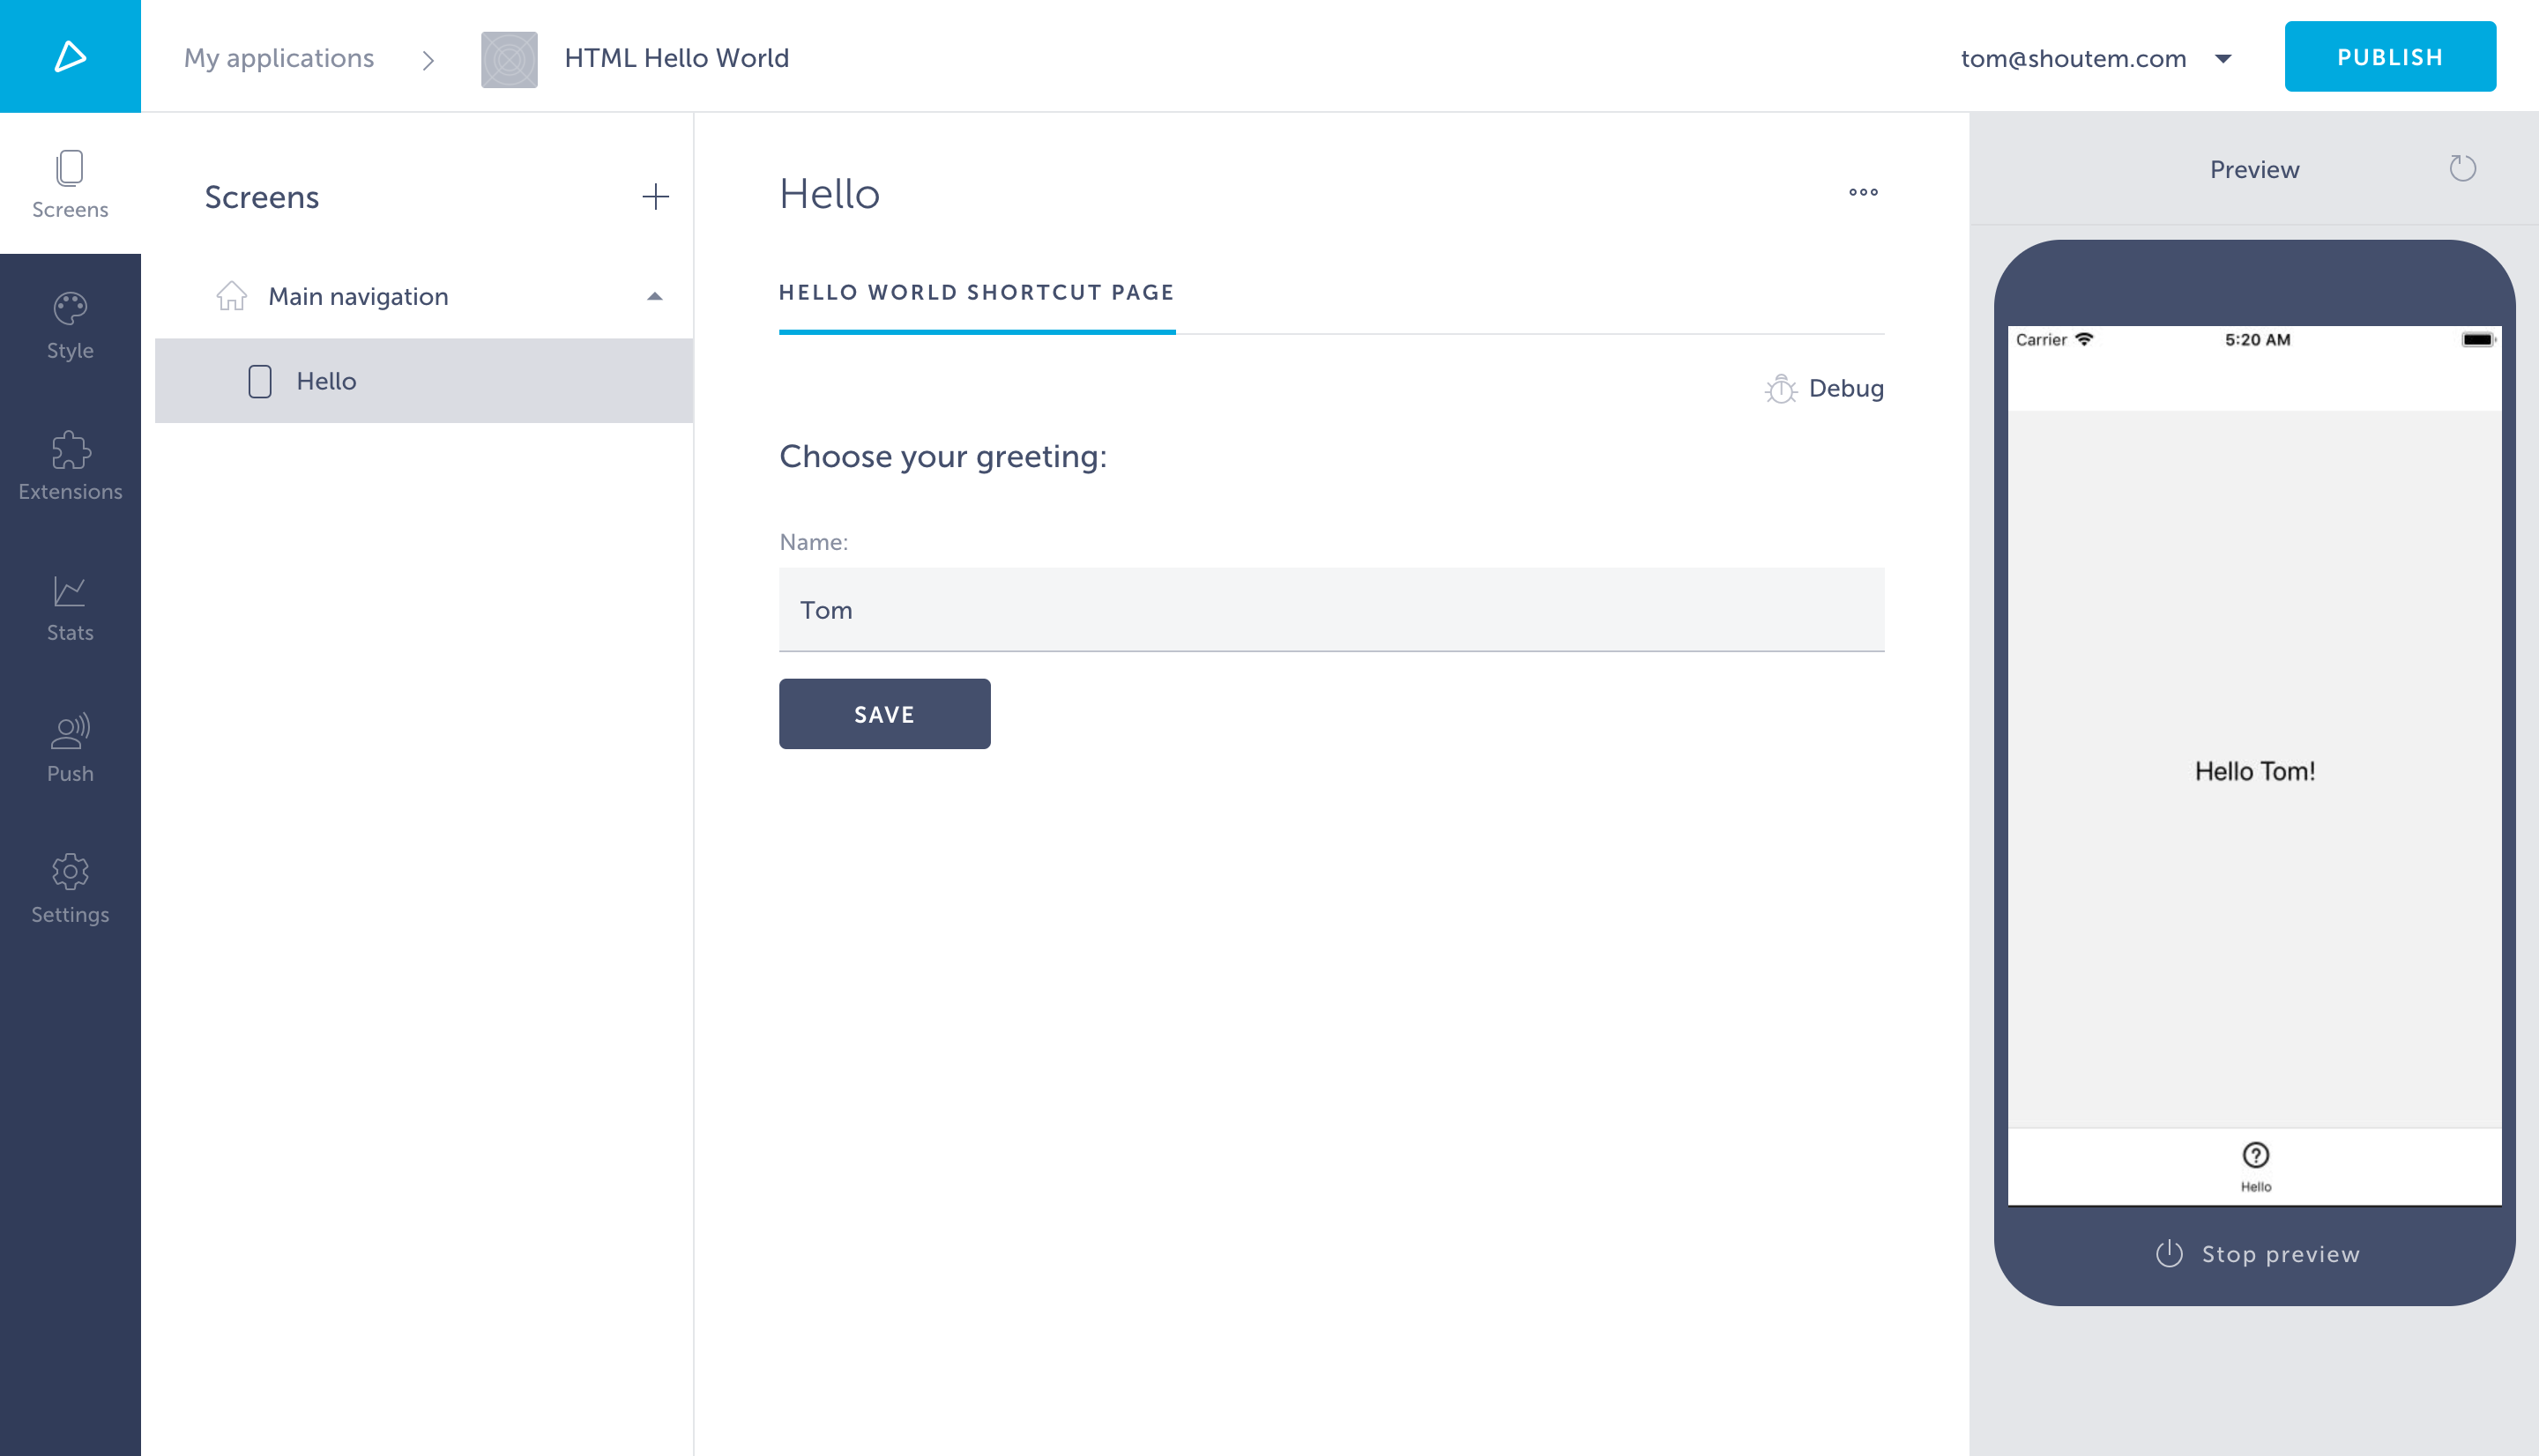
Now let’s create the actual settings page:
$ shoutem page add HelloWorldShortcutPage
? Page type: react
? Page name: HelloWorldShortcutPage
? Page title: Hello World Shortcut Page
? This settings page controls settings for: an existing screen
? Select existing screen: Hello
...
React settings page added to pages/hello-world-shortcut-page
HelloWorldShortcutPage was also added to extension.json as an adminPage of the Hello shortcut and as one of the pages of the extension:
#file: extension.json
"shortcuts": [
  {
    "name": "Hello",
    "title": "Hello",
    "description": "A shortcut for Hello",
    "screen": "@.Hello",
    "adminPages": [
      {
        "page": "@.HelloWorldShortcutPage",
        "title": "Hello World Shortcut Page"
      }
    ]
  }
],
"pages": [
  {
    "name": "HelloWorldShortcutPage",
    "path": "server/pages/hello-world-shortcut-page/index.html",
    "type": "html"
  }
]
This is the new structure of server folder:
server/
├ pages/
|  └ hello-world-shortcut-page
|    ├ index.html
|    ├ index.js
|    └ style.css
├ src/
└ package.json
It contains src and pages folders. The src is added by default when you initialize an extension, it doesn’t affect HTML settings pages. The pages folder hosts all your HTML settings pages. Since we made a shortcut settings page, it includes a simple example settings pages that allows the app owner to enter the name of an person to be greeted in the app in the index.html file.
#file: server/pages/hello-world-shortcut-page/index.html
<!DOCTYPE html>
<html lang="en">
<head>
    <meta charset="UTF-8">
    <title>Title</title>
    <link rel="stylesheet" href="https://static.shoutem.com/libs/web-ui/0.1.17/web-ui.css">
    <link rel="stylesheet" href="style.css">
</head>
<body>

  <form id="hello-form" action="#">
    <h3>Enter company name</h3>
    <div class="form-group">
      <label class="control-label" for="companyName">Company:</label>
      <input id="companyName" name="companyName" type="text" class="form-control required">
    </div>
    <div class="footer">
      <button class="btn btn-primary" type="submit">Save</button>
    </div>
  </form>

</body>
<script src="https://ajax.googleapis.com/ajax/libs/jquery/2.2.2/jquery.min.js"></script>
<script src="https://static.shoutem.com/libs/web-ui/0.1.17/bootstrap.min.js"></script>
<script src="https://static.shoutem.com/libs/iframe-resizer/3.5.8/iframeResizer.contentWindow.min.js"></script>
<script src="https://static.shoutem.com/libs/api-sdk/1.1.2/api-sdk.min.js"></script>
<script src="https://static.shoutem.com/libs/extension-sandbox/0.1.4/extension-sandbox.min.js"></script>
<script src="index.js"></script>
</html>
It uses:
shoutem variable globally for easier access of Shoutem APIindex.js comes with pre-made lifecycle methods for your settings page:
#file: server/pages/hello-world-shortcut-page/index.js
// listen for Shoutem initialization complete
document.addEventListener('shoutemready', onShoutemReady, false);

// handler for Shoutem initialization finished
function onShoutemReady(event) {
  // config object containing builder extension configuration, can be accessed via event
  // or by shoutem.sandbox.config
  const config = event.detail.config;

  // Waiting for DOM to be ready to initialize shoutem.api and call app start function
  $(document).ready(function() {
    shoutem.api.init(config.context);
    onPageReady(config);
  });
};

// Put your settings page logic here, executes when sandbox and DOM are initalized
function onPageReady(config) {
  function errorHandler(err) {
    console.log('Something went wrong:', err);
  }

  function handleSubmit(e) {
    // prevent default action and bubbling
    e.preventDefault();
    e.stopPropagation();

    const greeting = $('#greetingName').val();

    // updates current shortcut settings by patching with current settings
    shoutem.api.shortcuts.updateSettings({ greeting })
      .catch(errorHandler);

    return false;
  }

  function initForm(settings) {
    if(!settings) {
      return;
    }

    $('#greetingName').val(settings.greeting);
  }

  $('button[type="submit"]').click(handleSubmit);

  // shoutem.api knows current shortcut and returns promise with fetched settings
  shoutem.api.shortcuts.getSettings()
    .then(initForm, errorHandler);
}
Sandbox is a container where your settings page is loaded. Once it’s ready, onShoutemReady is triggered. By default, logic for extracting the configuration for your extension and initializing jQuery is inside that function. Write your own code after onShoutemReady.
Finally, we have a simple CSS file style.css where you can store your custom CSS:
#file: server/pages/hello-world-shortcut-page/style.css
.footer {
  margin-top: 15px;
}
This page is now created and referenced in the Hello shortcut in extension.json. Let’s add our greeting setting to it and give it a default value:
#file: extension.json
"shortcuts": [
  {
    "name": "Hello",
    "title": "Hello",
    "description": "A shortcut for Hello",
    "screen": "@.Hello",
    "adminPages": [
      {
        "page": "@.HelloWorldShortcutPage",
        "title": "Hello World Shortcut Page"
      }
    ],
    "settings": {
      "greeting": "Tom"
    }
  }
]
When the app owner clicks Save, we want to save the settings entered into the <input> field. This is doneusing the two functions in server/index.js: handleSubmit and initForm. For simplified communication with the Shoutem API, such as updating and getting shortcut settings, use api-sdk. It puts the shoutem object into the global environment.
Both these functions (and an errorHandler) are added into the onPageReady function when you generate a shortcut settings page.
#file: server/pages/hello-world-shortcut-page/index.js
function onPageReady(config) {
  function errorHandler(err) {
    console.log('Something went wrong:', err);
  }

  function handleSubmit(e) {
    // prevent default action and bubbling
    e.preventDefault();
    e.stopPropagation();

    const greeting = $('#greetingName').val();

    // updates current shortcut settings by patching with current settings
    shoutem.api.shortcuts.updateSettings({ greeting })
      .catch(errorHandler);

    return false;
  }

  function initForm(settings) {
    if(!settings) {
      return;
    }

    $('#greetingName').val(settings.greeting);
  }

  $('button[type="submit"]').click(handleSubmit);

  // shoutem.api knows current shortcut and returns promise with fetched settings
  shoutem.api.shortcuts.getSettings()
    .then(initForm, errorHandler);
}
The Shoutem CLI implemented the shortcut settings page into our pre-existing shortcut, all that is left to do is to access the settings in the Hello screen. Update the screen file:
#file: app/screens/Hello.js
export default class Hello extends Component {
  render() {
    const { shortcut } = this.props;
    const { greeting } = shortcut.settings;

    return (
      <View style={styles.container}>
        <Text style={styles.text}>Hello {greeting}!</Text>
      </View>
    );
  }
}
Now let’s publish and install the extension.
$ shoutem push
Uploading HTML Hello World extension to Shoutem...
Success!
$ shoutem install --new "HTML Hello World"
Extension installed
See it in browser: https://builder.shoutem.com/8074
Our default setting applies and the app owner has an input form to change the greeting value.
Extension settings pages provide you with settings that you can pass to every part of the extension, so in our simple use case, we’ll suppose the extension settings page lets the app owner determine which company the person being greeted is working for, as you can see from the input form.
The key difference between extension and shortcut settings pages is where they’re defined in the extension.json. They’re defined on the same level as shortcuts and pages. Let’s create an extension settings page.
$ shoutem page add
? Page type: html
? Page name: HelloWorldExtensionPage
? Page title: Hello World Extension Page
? This settings page controls setting sfor: the 'html-hello-world' extension
...
React settings page added to pages/hello-world-extension-page
The CLI added HelloWorldExtensionPage to the root level of extension.json, but let’s add a default value.
#file: extension.json
"settingsPages": [
  {
    "page": "@.HelloWorldExtensionPage",
    "title": "Hello World Extension Page"
  }
],
"settings": {
  "company": "Shoutem"
}
The template page generated is pretty much identical to the one generated for HelloWorldShortcutPage, except the shoutem.api references extensions instead of shortcuts, and company instead of greeting.
#file: server/pages/hello-world-extension-page/index.js
function handleSubmit(e) {
  // prevent default action and bubbling
  e.preventDefault();
  e.stopPropagation();

  const company = $('#companyName').val();

  // updates extension settings by patching with current settings
  shoutem.api.extensions.updateSettings({ company })
    .catch(errorHandler);

  return false;
}

...

// shoutem.api returns promise with fetched settings
shoutem.api.extensions.getSettings()
  .then(initForm, errorHandler);
#file: server/pages/hello-world-extension-page/index.html
<form id="hello-form" action="#">
  <h3>Enter company name</h3>
  <div class="form-group">
    <label class="control-label" for="companyName">Company:</label>
    <input id="companyName" name="companyName" type="text" class="form-control required">
  </div>
  <div class="footer">
    <button class="btn btn-primary" type="submit">Save</button>
  </div>
</form>
Let’s retrieve that company value from the redux store and use it in our Hello screen.
#file: app/screens/Hello.js
import React, {
  Component
} from 'react';

import {
  StyleSheet,
  Text,
  View
} from 'react-native';

import { connect } from 'react-redux';
import { connectStyle } from '@shoutem/theme';
import _ from 'lodash';
import { getExtensionSettings } from 'shoutem.application';
import { ext } from '../const';

export class Greeting extends Component {
  render() {
    const { shortcut, company } = this.props;
    const { greeting } = shortcut.settings;

    return (
      <View style={styles.container}>
        <Text style={styles.text}>Hello {greeting}!</Text>
        <Text style={styles.text}>You work for {company}.</Text>
      </View>
    );
  }
}

const styles = StyleSheet.create({
  container: {
    flex: 1,
    justifyContent: 'center',
    alignItems: 'center',
  },
  text: {
    fontSize: 20,
  },
});

export const mapStateToProps = (state) => {
  const extensionSettings = getExtensionSettings(state, ext());
  const company = _.get(extensionSettings, 'company');

  return {
    company
  };
};

export default connect(mapStateToProps, undefined)(
  connectStyle(ext('Greeting'))(Greeting),
);
Finally, let’s push the new version of our html-hello-world extension that we’ve made to Shoutem and see our extension settings page in action.
$ shoutem push
Uploading HTML Hello World extension to Shoutem...
Success!
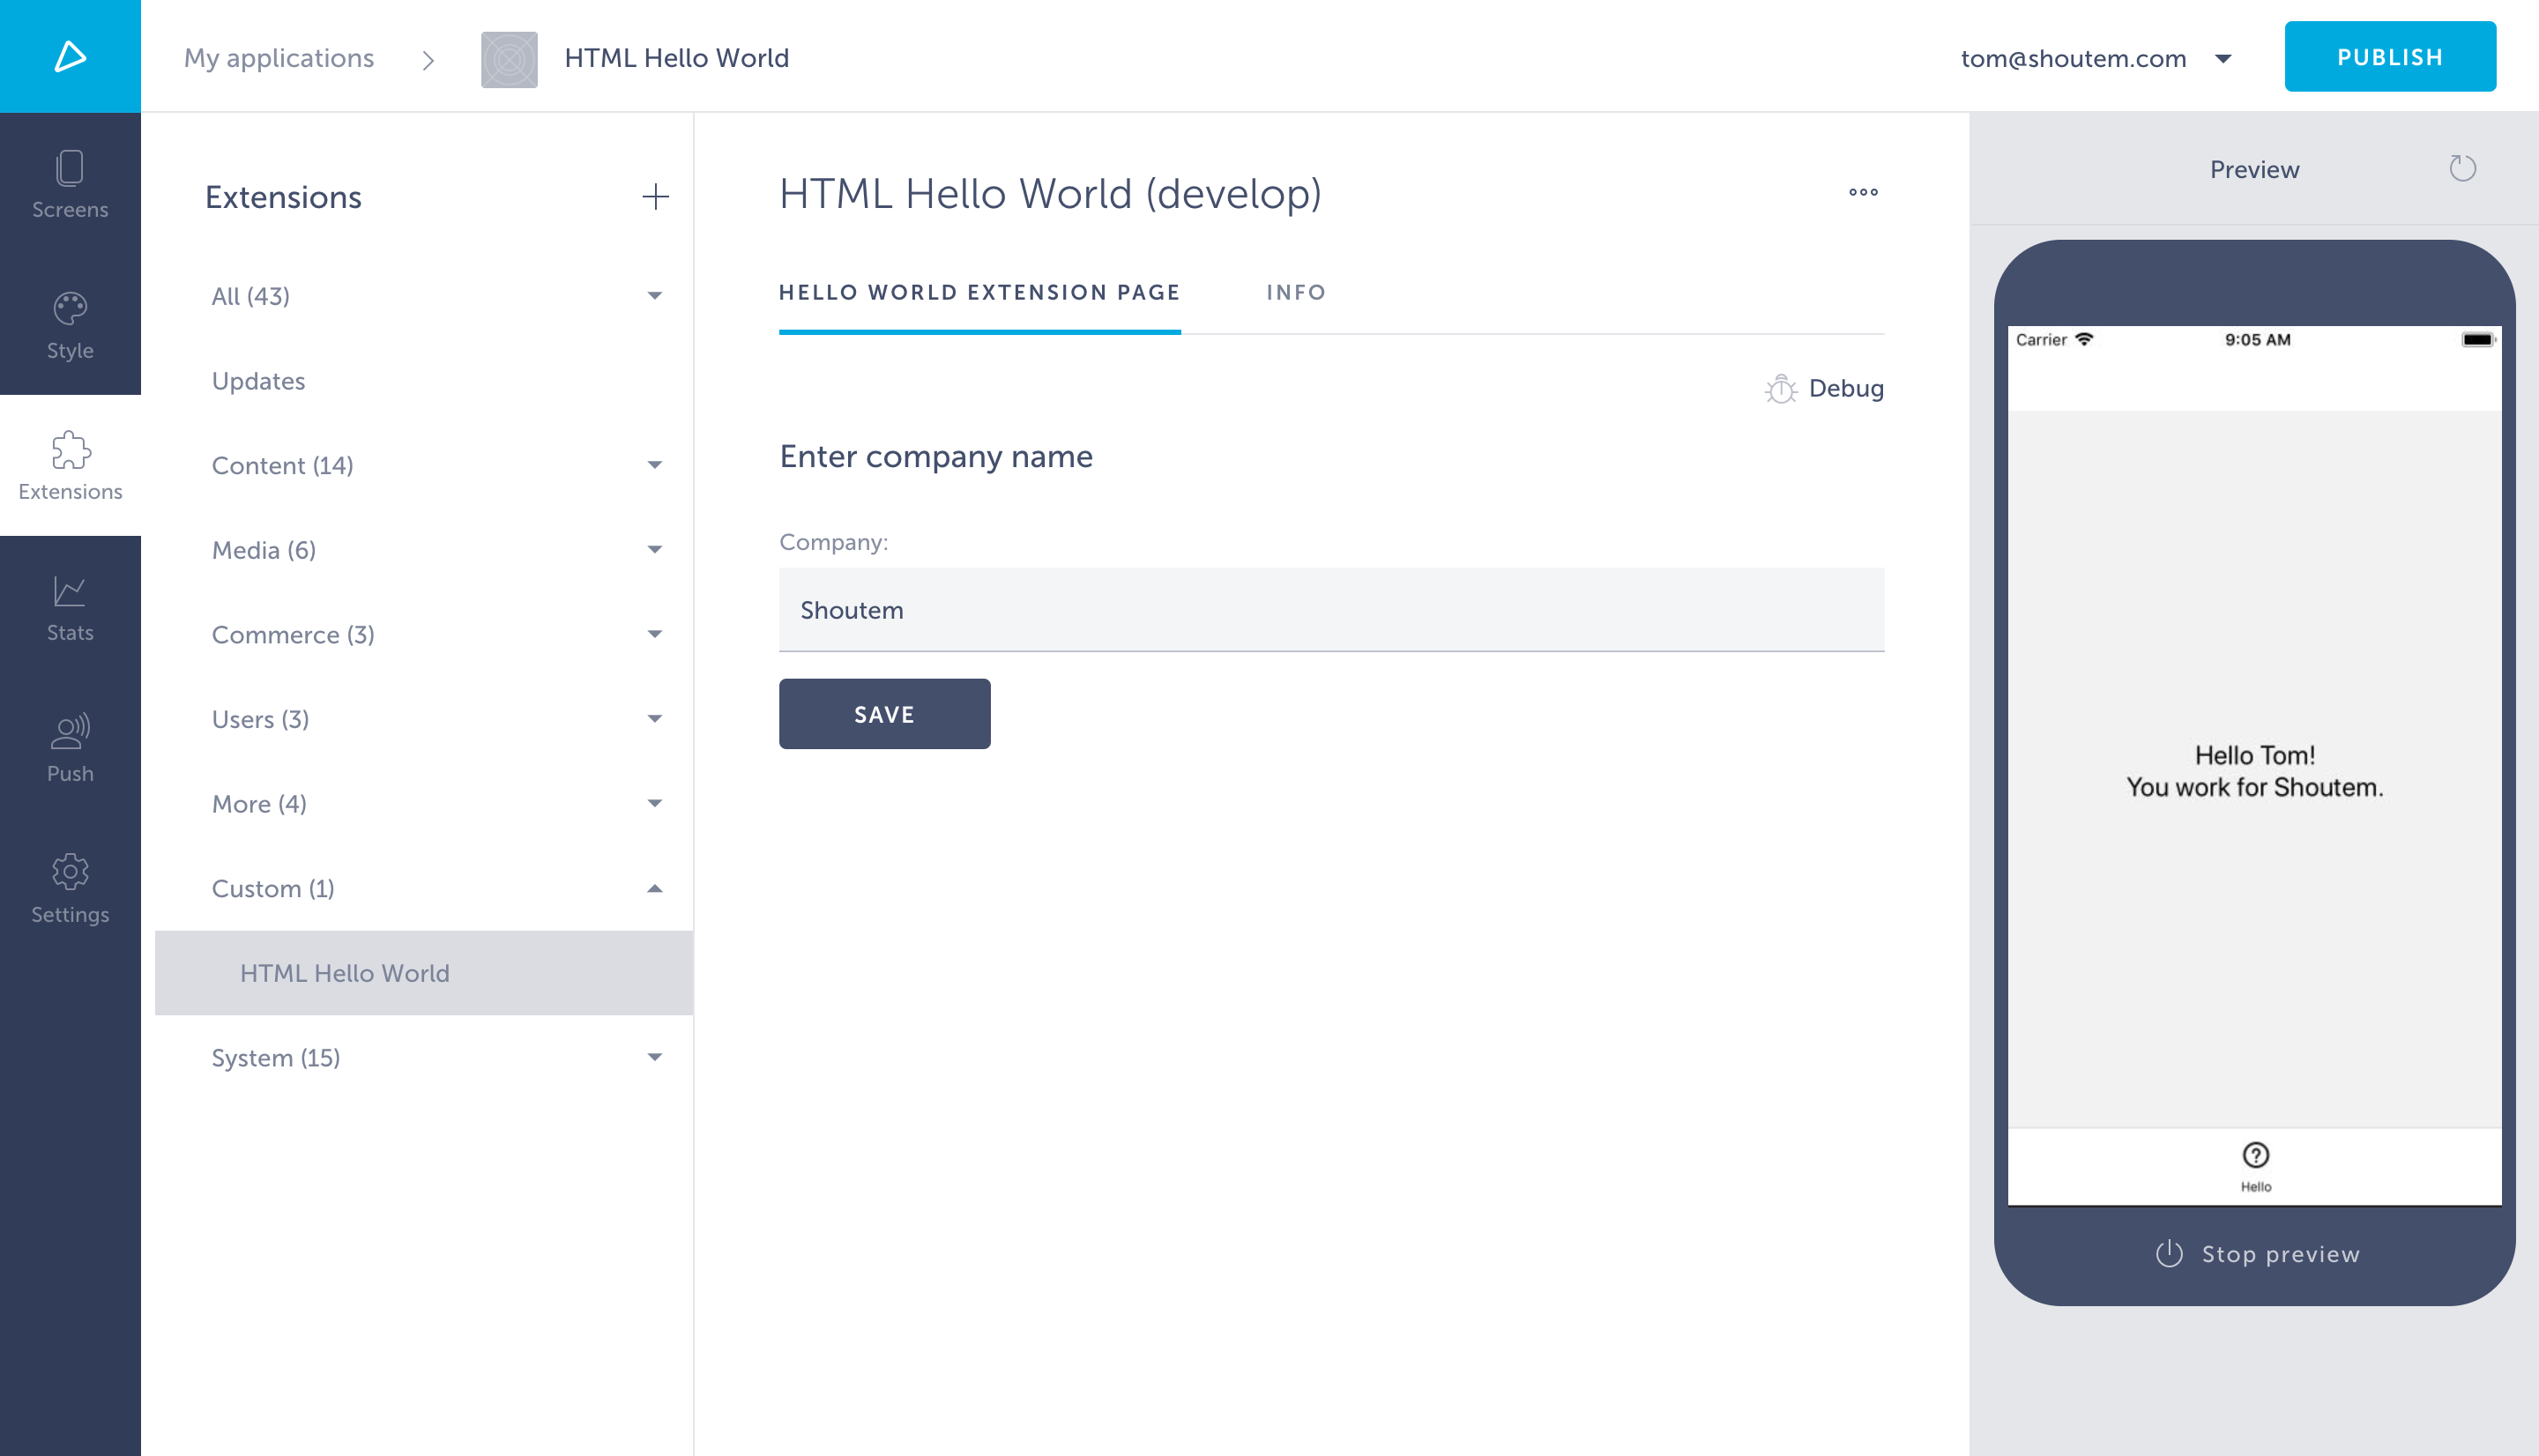
So what’s the purpose of extension settings pages as opposed to shortcut? Well, in our simple example, we made an extension where the app owner can define which company he’s addressing and then make each Screen he adds on the Builder greet a unique employee. Each screen added will address the company defined in the Extension settings pages, while the app owner can choose which employee each screen greets.