Stay informed
Subscribe to our newsletter if you'd like to stay informed about Shoutem Extensions and Shoutem UI Toolkit.
Shoutem’s mission is simple - do not solve problems that have already been solved. Quite often apps that we build need common features you’ve seen numerous times: push notifications, analytics, ads, authentication, RSS readers, eCommerce integrations and so on. This is what extensions are for - just reuse pre-built features.
However, for the app to succeed, it needs to be unique. Recreating an RSS reader just to make it unique is redundant work. Sometimes, it’s enough to customize your app in the dashboard, customize the theme, or write a new theme, but sometimes we need to modify the currently available extensions.
There are two ways to achieve this:
Both methods result in a brand new extension. (Yes, even when you extend an extension)
Since all Shoutem extensions are open sourced, you can directly take the code of an extension, modify it and push it as your own extension to Shoutem.
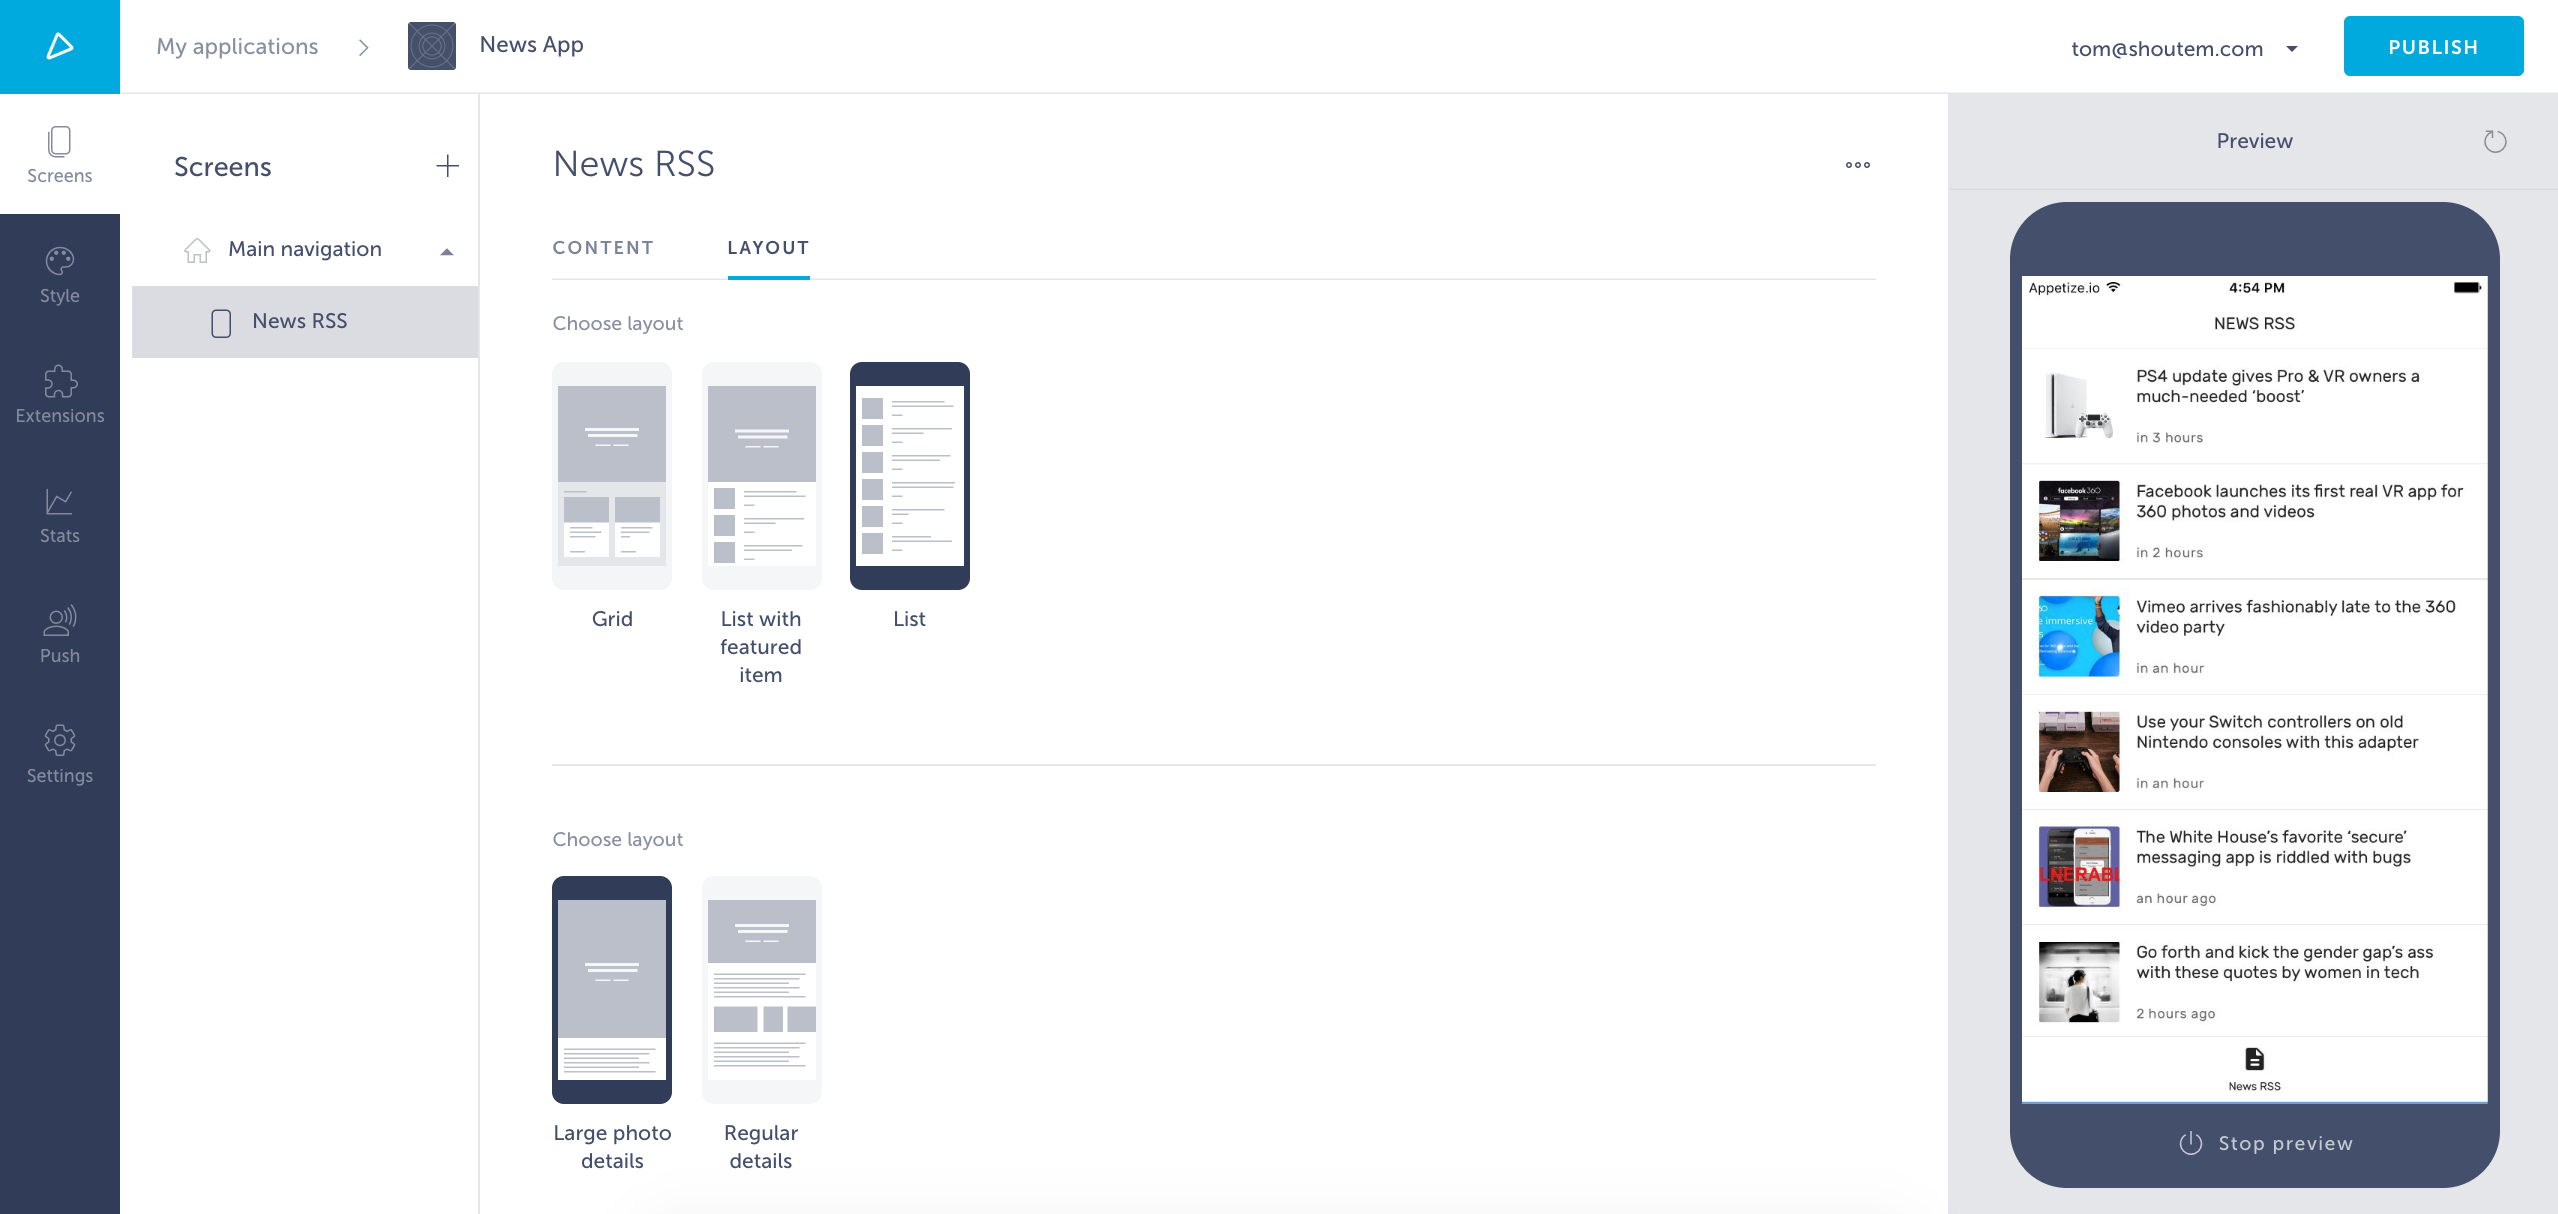
For the purpose of this demo, create a new blank app and add a News RSS screen inside of the navigation. In the Content section, enter a link to an RSS feed (e.g. https://www.nasa.gov/rss/dyn/breaking_news.rss). In the Layout section, select List as the default layout.
This is what it should look like (images and text vary with RSS feed):
You do want list layout, but with large images in Tiles, such as the ones provided in the UI toolkit. So let’s modify News RSS extension directly to get those large images.
Download the News RSS extension from the repository and navigate to the extension’s folder:
$ cd shoutem.rss-news
Check the renderRow method in app/screens/ArticlesListScreen.js:
#file: app/screens/ArticlesListScreen.js
  renderRow(article) {
    return (
      <ListArticleView
        key={article.id}
        articleId={article.id}
        title={article.title}
        imageUrl={getLeadImageUrl(article)}
        date={article.timeUpdated}
        onPress={this.openArticleWithId}
      />
    );
  }
It uses the ListArticleView component. Customize the render method in that component to use Tiles and don’t forget to import additional components from the @shoutem/ui. This is the complete code you should end up with:
#file: app/components/ListArticleView.js
import React from 'react';
import moment from 'moment';

import {
  TouchableOpacity,
  Caption,
  ImageBackground,
  Tile,
  Title
} from '@shoutem/ui';

import { ListArticleView } from 'shoutem.news/components/ListArticleView';
import { getLeadImageUrl } from 'shoutem.rss';

export class ListArticleView extends ArticleView {
  render() {
    const { article } = this.props;
    const dateFormat = moment(article.timeUpdated).isBefore(0) ?
    null : (<Caption>{moment(article.timeUpdated).fromNow()}</Caption>);

    return (
      <TouchableOpacity key={article.id} onPress={this.onPress}>
        <ImageBackground
          styleName="featured"
          source={{ uri: getLeadImageUrl(article) }}
        >
          <Tile>
            <Title styleName="md-gutter-bottom">{article.title}</Title>
            {dateFormat}
          </Tile>
        </ImageBackground>
      </TouchableOpacity>
    );
  }
}
And that’s it! Save it and push it to Shoutem:
$ shoutem push
Uploading `News RSS` extension to Shoutem...
Success!
Install it on your app either through the Builder or with:
$ shoutem install
Select app to install extension: News App
Success!
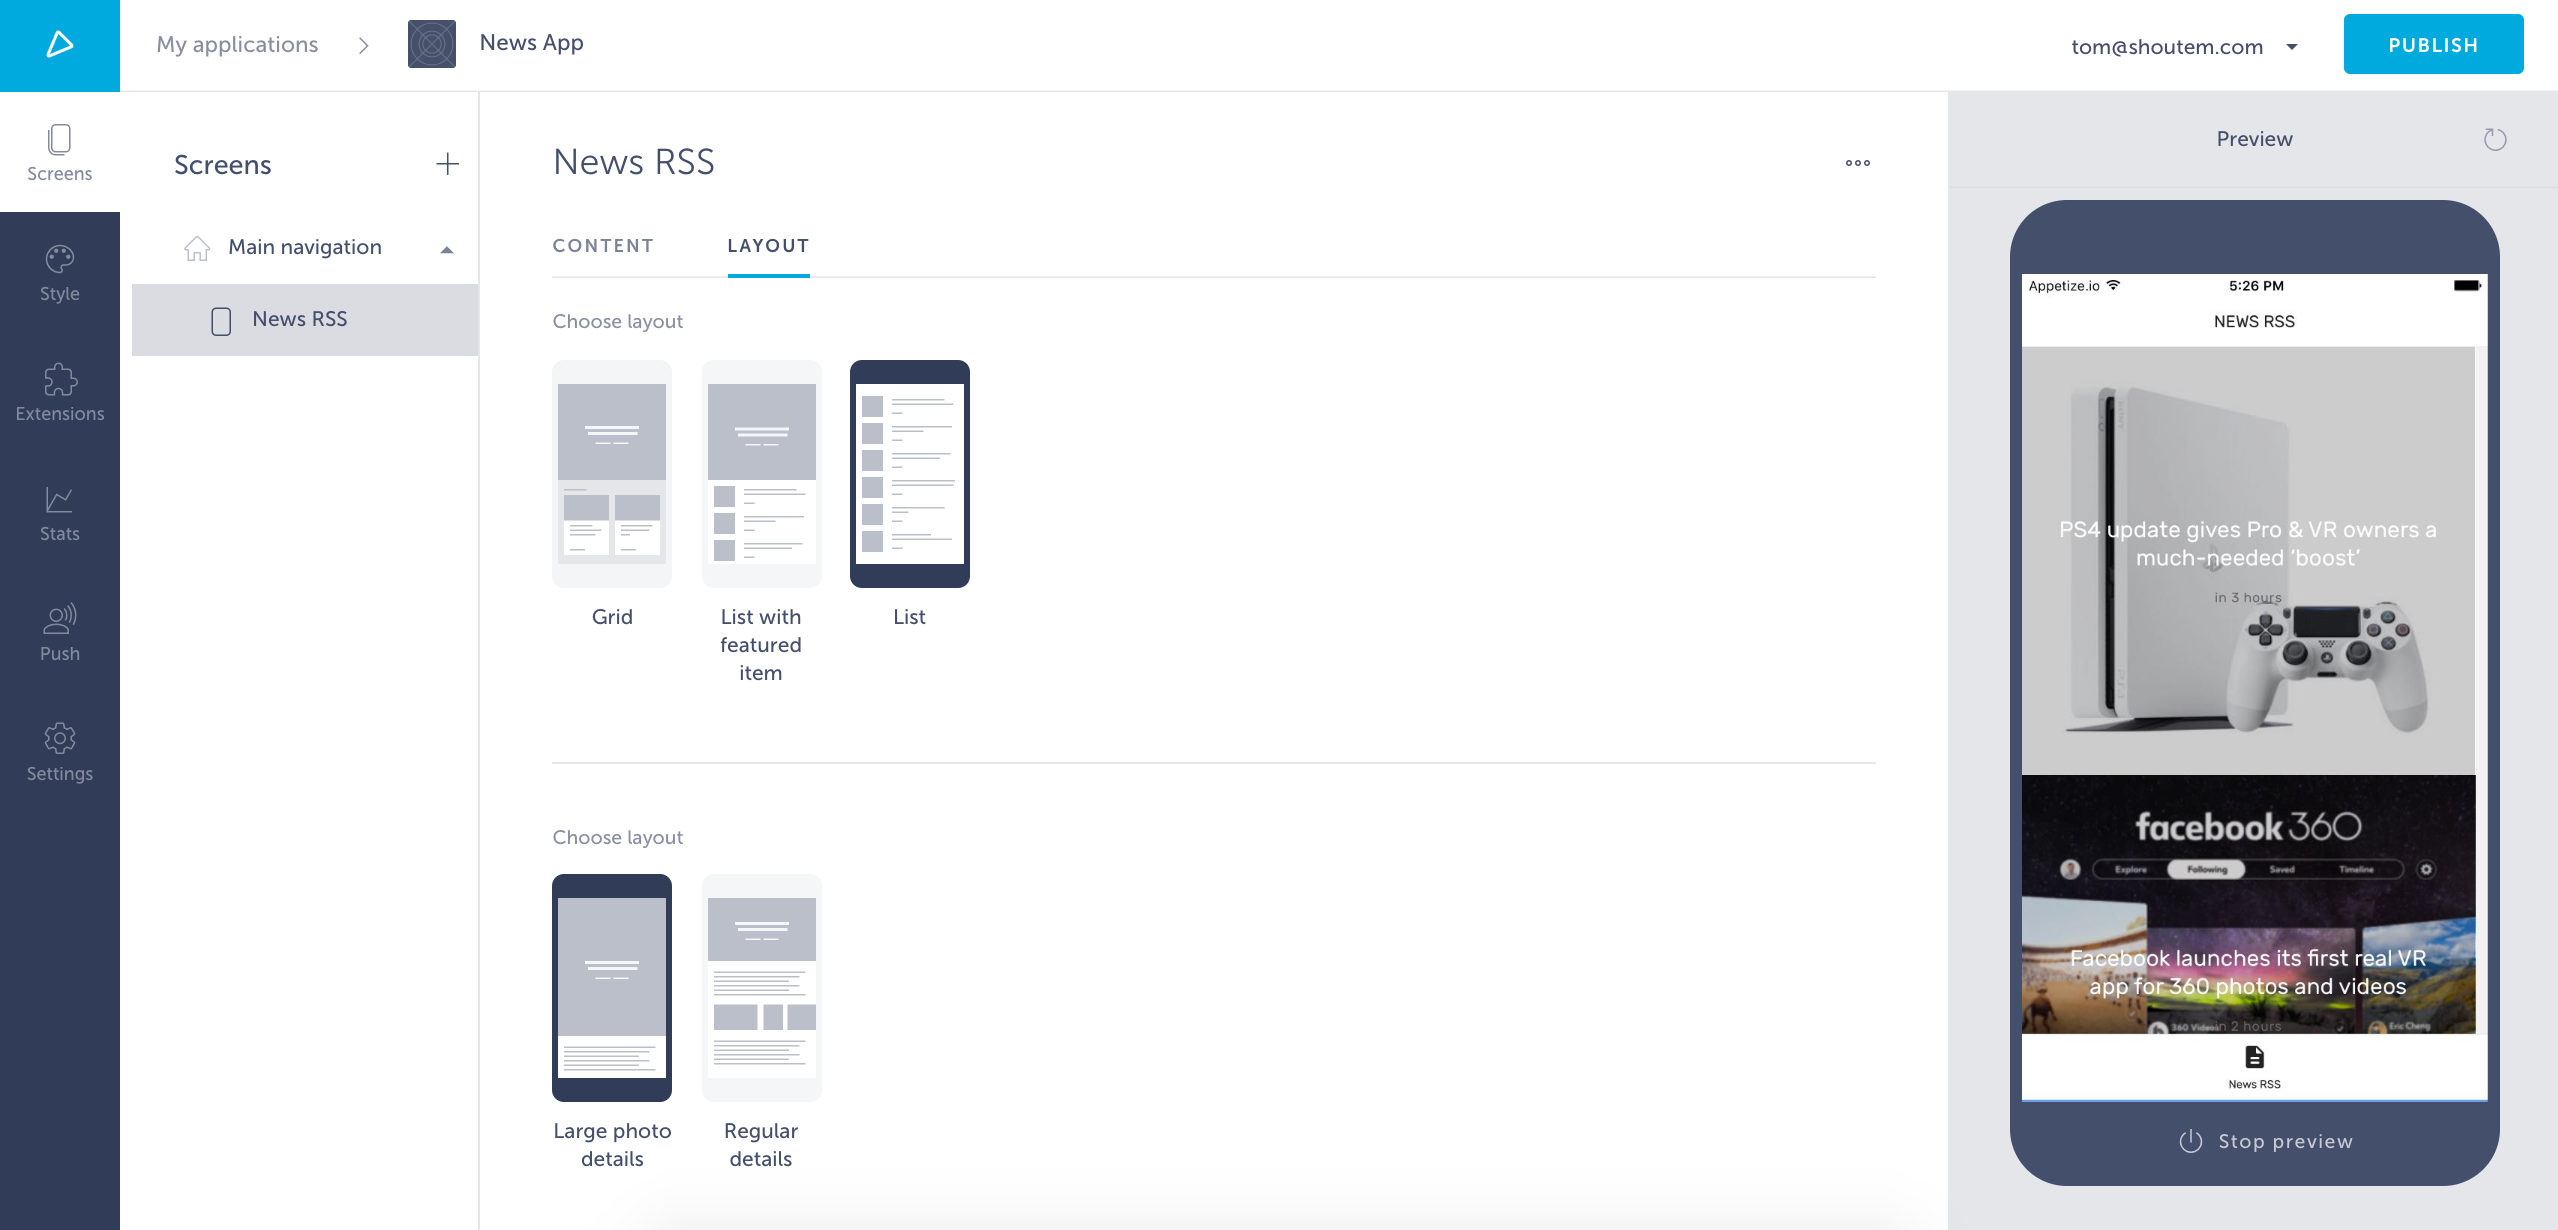
Delete the old News RSS screen from the navigation (click on the ... in the top right corner and select Delete), insert the new News RSS screen from the Custom category, set up your RSS feed in the Content tab and select the List layout from the Layout tab.
This is what you should get (images and text vary with RSS feed):
This is what we wanted! It was quite easy and straightforward. However, doing this means creating a completely separate extension which won’t get any updates done by Shoutem on Shoutem’s News RSS extension.
To get those updates from Shoutem, we want to extend the extension instead of changing its code directly.
When directly editing Shoutem extensions you will have to either re-clone the app after uploading and installing the extension into your app or re-naming the extension’s directory name locally, otherwise you might experience issues on the Builder.
Note
When forking (directly editing) Shoutem’s extensions, you should re-clone the app after uploading and installing the extension to keep everything in sync.
For example, you decide to modify the News extension and install it to your app, then uninstall shoutem.news so you only have your News extension installed, tom.news. This will cause issues with shoutem.rss-news because it imports components from shoutem.news in multiple places:
#file: shoutem.rss-news/app/ArticlesGridScreen.js
import { FeaturedArticleView, GridArticleView } from 'shoutem.news';
In the described situation, the Builder preview will fail, but locally your app will function as intended. This is because your local extension directory for tom.news is still called shoutem.news, while the Builder only has tom.news. In order to catch these sorts of issues locally, you will have to either rename the extension directory or re-clone the app.
$ shoutem clone --dir "Fresh Clone"
Extending an extension is the preferred way of modifying extensions.
For bigger modifications, such as changing the data schema being used, it’s not possible to modify functionality without directly modifying the extension. Extending extensions is usually done for writing screen layouts, extending components (overwriting contents) and such.
Here is the open sourced extension as the final result of this chapter. Let’s create a new extension:
$ shoutem init news-rss
...
Extension initialized!
Switch over to the newly made directory:
$ cd tom.news-rss
Create a new screen which will extend the List screen from the original Shoutem News RSS extension:
$ shoutem screen add ListWithBigPictures
? Screen name: ListWithBigPictures
? Create a shortcut (so that screen can be added through the Builder)? No
Success
Now we need to say which screen our ListWithBigPictures screen extends. Do this in extension.json in the extends field:
#file: extension.json
{
  "name": "news-rss",
  "title": "My news RSS",
  "version": "0.0.1",
  "description": "",
  "platform": "1.*.*",
  "screens": [{
    "name": "ListWithBigPictures",
    "title": "List with big pictures",
    "image": "./server/assets/large-news-list.png",
    "extends": "shoutem.rss-news.ArticlesGridScreen"
  }]
}
We extended ArticlesGridScreen from Shoutem’s News RSS extension, since it’s the original screen. We’ve also added a title and image which will both be shown in the layout selector. Download the image here, extract it and paste the assets folder into the extension’s server folder.
Note
If you can’t remember the fields in
extension.json, all of them are documented in the reference.
Let’s implement our ListWithBigPictures screen. In extension.json, we are extending ArticlesGridScreen, but that’s only for the layout selector. In the implementation, we actually want to extend the ArticlesListScreen. Why? Because ArticlesListScreen renders the ListArticleView component from Shoutem News.
When overriding that method, we could immediately implement the ListArticleView functionality inside. However, since we want to get Shoutem’s updates for the ListArticleView component too, we’ll create a new component extending that one and use it in the overridden renderRow function.
Create the components folder and a component file inside:
$ mkdir app/components
$ touch app/components/BigPictureView.js
Implement the BigPictureView component:
#file: app/components/BigPictureView.js
import React from 'react';
import moment from 'moment';

import {
  TouchableOpacity,
  Caption,
  ImageBackground,
  Tile,
  Title,
} from '@shoutem/ui';

import { ListArticleView } from 'shoutem.news/components/ListArticleView';
import { getLeadImageUrl } from 'shoutem.rss';

const resolveDateCaption = (article) => (
  moment(article.timeUpdated).isBefore(0) ? null :
  <Caption>{moment(article.timeUpdated).fromNow()}</Caption>
);

export class BigPictureView extends ListArticleView {
  render() {
    const { article } = this.props;
    const dateFormat = resolveDateCaption(article);

    return (
      <TouchableOpacity key={article.id} onPress={this.onPress}>
        <ImageBackground
          styleName="featured"
          source={{ uri: getLeadImageUrl(article) }}
        >
          <Tile>
            <Title styleName="md-gutter-bottom">{article.title}</Title>
            {dateFormat}
          </Tile>
        </ImageBackground>
      </TouchableOpacity>
    );
  }
}
We’re importing ListArticleView from the shoutem.news extension, since the app folder is bundled into the overall app.
We’ve implemented the new render function and deleted everything we didn’t need to override from the ListArticleView component.
Now, let’s override the renderRow method in the ListWithBigPictures screen:
#file: app/screens/ListWithBigPictures.js
import React from 'react';
import { connect } from 'react-redux';
import { connectStyle } from '@shoutem/theme';

import {
  ArticlesListScreen,
  mapStateToProps,
  mapDispatchToProps,
} from 'shoutem.rss-news/screens/ArticlesListScreen';

import { BigPictureView } from '../components/BigPictureView';
import { ext } from '../const';

export class ListWithBigPictures extends ArticlesListScreen {
  renderRow(article) {
    return (
      <BigPictureView
        article={article}
        onPress={this.openArticleWithId}
        articleId={article.id}
      />
    );
  }
}

// since the original screen is connected to redux state,
// we have to reconnect it in our screen too
export default connect(mapStateToProps, mapDispatchToProps)(
  connectStyle(ext('ListWithBigPictures'))(ListWithBigPictures),
);
And we’re done! Push the extension to Shoutem.
$ shoutem push
Uploading `My news RSS` extension to Shoutem...
Success!
Install it to a new blank app:
shoutem install --new "News App"
...
Open your new app in the Builder. Now, add a screen from the Shoutem News RSS extension. Why that one? Because in our new extension, we only extended a screen and didn’t create a new shortcut, so we couldn’t add it’s screen even if we wanted to! However, since both News RSS and My news RSS are installed in the app, the layout selector will recognize the new List with big pictures layout from My news RSS and show it in the layout list of Shoutem’s News RSS.
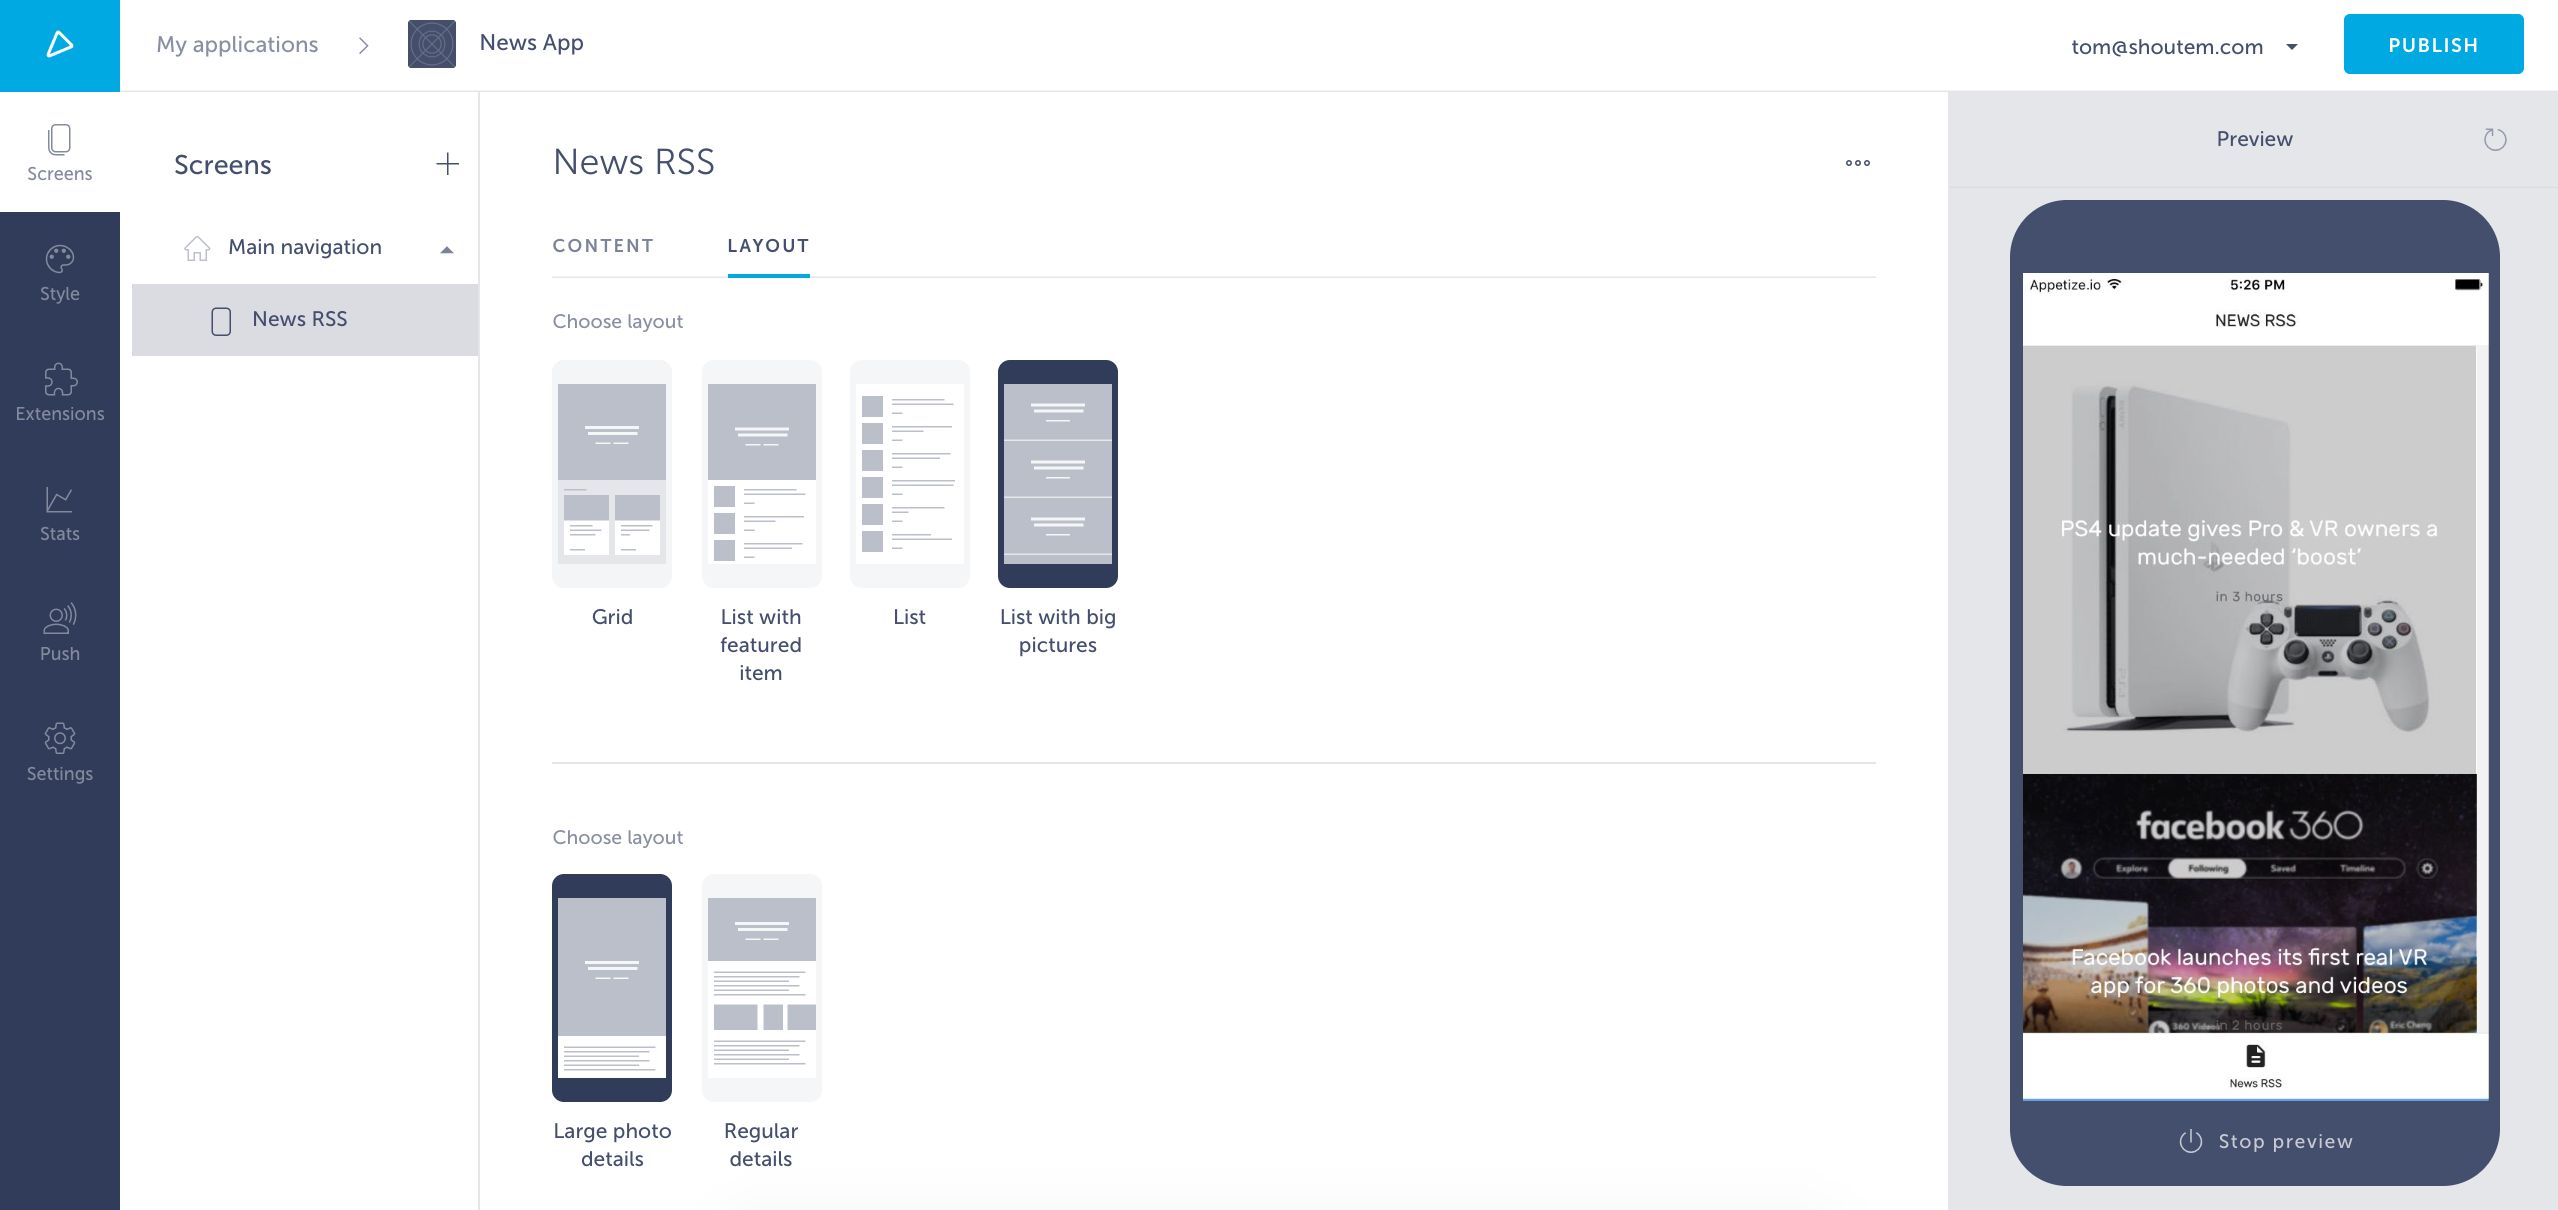
Add an RSS feed in the Content tab, select the new layout in the Layout tab and run the app. This is what you should get (images and text vary with RSS feed):
This way, we only extended Shoutem’s News RSS extension and our extension will automatically get the all updates from Shoutem.