Stay informed
Subscribe to our newsletter if you'd like to stay informed about Shoutem Extensions and Shoutem UI Toolkit.
Since Shoutem is an architecture built on top of React Native and we made sure not to restrict developers on how to use React Native, it’s of course possible to utilize any and all 3rd party packages that you would be able to use with your regular React Native projects.
This tutorial will show you how to install a 3rd party package into an extension and through that into the entire app. For an example we’re going to use react-native-swiper as a non-native package and react-native-camera as a native package.
A non-native package doesn’t utilize native capabilities of the underlying device. Simply put, the package doesn’t handle anything differently regardless of the fact it’s being run on iOS or Android. When you finish this tutorial you’ll have a functioning swiper-extension.
To begin, we’ll need an extension, so let’s just make one. If this is something you don’t know how to do yet, you should really go through My First Extension to make sure you understand the fundamentals.
We begin by initializing an extension and writing in the basic information about it.
$ shoutem init swiper-extension
Enter information about your extension. Press `return` to accept (default) values.
Title: Swiper Extension
Version: 0.0.1
Description: Extension that uses react-native-swiper.

Initializing extension:
...

Extension initialized!
Let’s switch over to the extension directory and add a screen with a shortcut that will show the Swiper.
$ shoutem screen add SwiperScreen
? Screen name: SwiperScreen
? Create a shortcut (so that screen can be added through the Builder)? Yes
? Shortcut name: Swiper
? Shortcut title: Swiper
? Shortcut description: A shortcut for SwiperScreen
...
Success
All we have to do is install the package into the extension using npm install react-native-swiper --save in the app directory:
$ cd app
$ npm install react-native-swiper --save
tom.swiper-extension@0.0.1 /absolute/path/swiper-extension/app
└── react-native-swiper@1.5.4
Note
The reason we have to install it into the
appdirectory is because the theappdirectory is bundled into the full app along with all the other extensions the app uses.
Doing this will automatically add react-native-swiper as a dependency in our app/package.json file:
#file: app/package.json
{
  "name": "tom.not-swiper",
  "version": "0.0.1",
  "description": "Extension that uses react-native-swiper.",
  "dependencies": {
    "react-native-swiper": "^1.5.4"
  }
}
You can ignore the node_modules folder that you can now see in your extension’s directory, because it’ll be ignored since extensions are packed with npm pack before being installed into an app.
Our extension now has full access to everything react-native-swiper has to offer and we can use it just like we would in a normal React Native app, so let’s make use of it’s simplest example to show how it works. We’ll have to edit our app/screens/SwiperScreen.js file to use the Swiper by importing the Swiper component, changing the render(); method to use the Swiper component and making some changes to the styles constant so our Swiper component can function properly.
#file: app/screens/SwiperScreen.js
import React, {
  Component
} from 'react';

import {
  StyleSheet,
  Text,
  View
} from 'react-native';

import Swiper from 'react-native-swiper';

export default class SwiperScreen extends Component {
  render() {
    return (
      <Swiper showsButtons>
        <View style={styles.slide1}>
          <Text style={styles.text}>Hello Swiper</Text>
        </View>
        <View style={styles.slide2}>
          <Text style={styles.text}>Beautiful</Text>
        </View>
        <View style={styles.slide3}>
          <Text style={styles.text}>And simple</Text>
        </View>
      </Swiper>
    );
  }
}

const styles = StyleSheet.create({
  text: {
    color: '#FFFFFF',
    fontSize: 30,
    fontWeight: 'bold',
  },
  slide1: {
    flex: 1,
    justifyContent: 'center',
    alignItems: 'center',
    backgroundColor: '#9DD6EB',
  },
  slide2: {
    flex: 1,
    justifyContent: 'center',
    alignItems: 'center',
    backgroundColor: '#97CAE5',
  },
  slide3: {
    flex: 1,
    justifyContent: 'center',
    alignItems: 'center',
    backgroundColor: '#92BBD9',
  }
});
And there we go, we implemented react-native-swiper into our extension. Now we need to push our extension to the Shoutem server and install it onto an app so we can actually test it out:
$ shoutem push
Uploading `Swiper Extension` extension to Shoutem...
Success!
$ shoutem install --new SwiperApp
Extension installed
See it in browser: `https://builder.shoutem.com/app/8074`
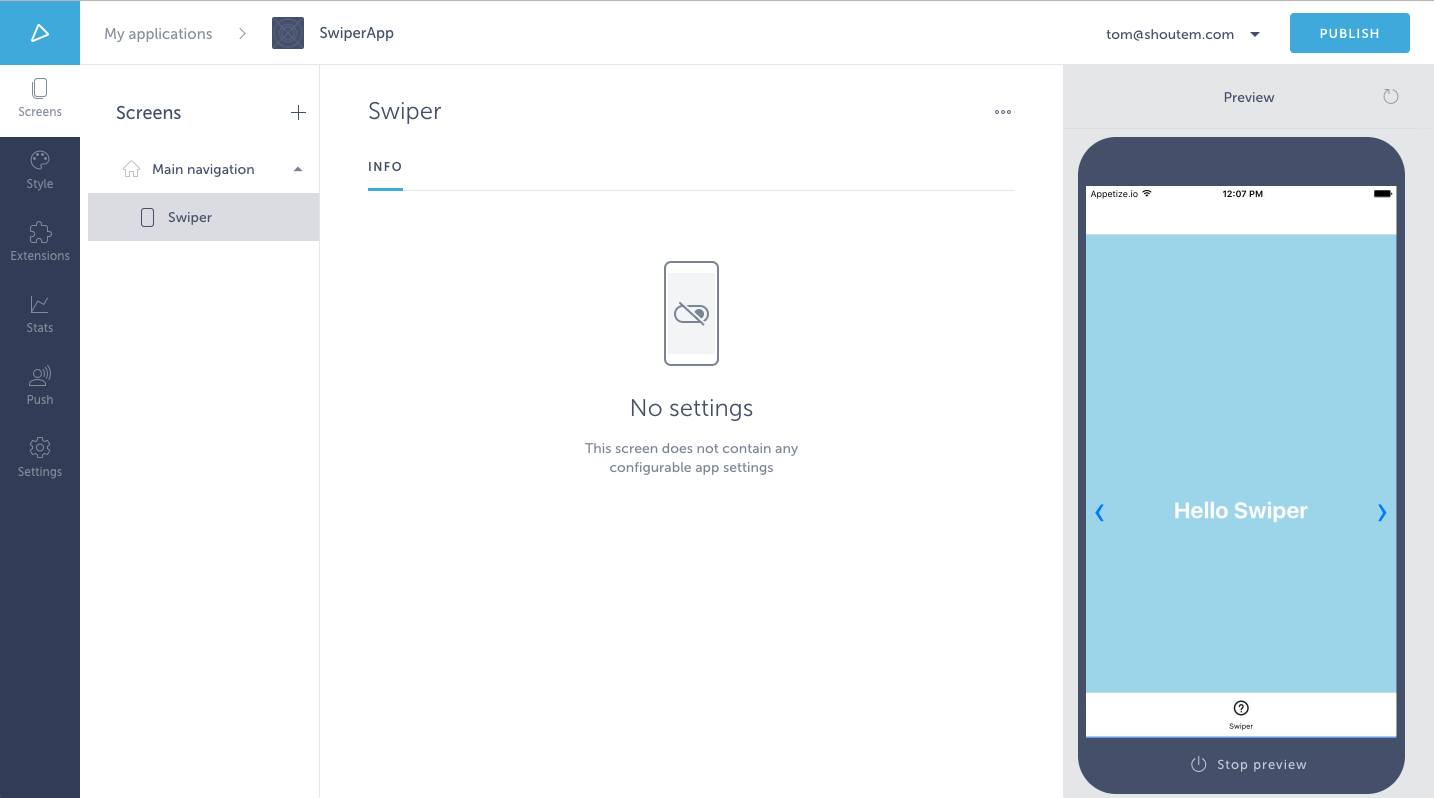
Opening the SwiperApp in the Builder will show us an app with no Screens, but since we just installed our Swiper Extension onto the app, we can just add the Swiper screen to it by clicking on the + button next to Screens, going to the Custom category and selecting the Swiper Extension. As soon as it’s loaded into the Main Navigation we can preview the app:
A native package utilizes native capabilities of the underlying device. When installing such a package we have to make sure we link the native dependencies it has.
With the introduction of autolinking, it is now surprisingly easy to add native packages to your app if they support it. Simply add the name of the package into your extension’s app/package.json under a nativePackages property.
#file: app/package.json
{
  "name": "tom.qr-reader-extension",
  "version": "0.0.1",
  "description": "An extension that scans QR codes and displays the encoded information to the user.",
  "dependencies": {
    "react-native-camera": "~3.11.0"
  },
  "nativeDependencies": [
    "react-native-camera"
  ]
}
If your dependency doesn’t support autolinking or you want to manually link it, you can use a react-native.config.js file inside of your extension’s app segment to run a prelink or postlink hook, as well as disable autolinking for it.
Since extensions are effectively used as npm packages, the react-native.config.js file should reflect this.
#file: app/react-native.config.js
module.exports = {
  dependency: {
    platforms: {
      android: null,
      ios: null,
    },
    hooks: {
      postlink: 'node ./node_modules/tom.qr-reader-extension/scripts/run.js',
    },
  },
};
We use a postlink hook because our configuration script will run react-native link on any extension with ios or android directories, as well as if it has any nativeDependencies set in it’s package.json file.
If you’re confused by what the run.js script is, please read the section after this one, where it’s explained.
This is done using postinstall scripts. As an example, we’ll be making a QR Code reader that’s going to display what the scanned QR code says. To scan a QR code we’ll need to use the devices camera, which we’ll get access to using react-native-camera, a 3rd party package for utilizing device cameras.
When you finish this tutorial you’ll have a functioning qr-reader-extension, like the one from our extension examples.
To begin, we’ll need an extension, so let’s just make one. If this is something you don’t know how to do yet, you should really go through My First Extension to make sure you understand the fundamentals.
We begin by initializing an extension and writing in the basic information about it.
$ shoutem init qr-reader-extension
Enter information about your extension. Press `return` to accept (default) values.
Title: QR Reader
Version: 0.0.1
Description: An extension that scans QR codes and displays the encoded information to the user.
Initializing extension:
Installing packages for server...
...

Extension initialized.
Let’s switch over to the extension directory and add a screen with a shortcut that will be the user interface for our QR Reader.
$ shoutem screen add QRReaderScreen
? Screen name: QRReaderScreen
? Create a shortcut (so that screen can be added through the Builder)? Yes
? Shortcut name: QRReader
? Shortcut title: QRReader
? Shortcut description: A shortcut for QRReaderScreen
...
Success
To make sure the native dependencies are linked, we’ll have to make sure our custom postlink script is run by putting it in our app/package.json file. rnpm’s postlink command runs our app/scripts/run.js script that we’ll explain afterwards.
#file: app/package.json
{
  "name": "tom.qr-reader-extension",
  "version": "0.0.1",
  "description": "An extension that scans QR codes and displays the encoded information to the user.",
  "dependencies": {
    "react-native-camera": "1.1.4"
  },
  "rnpm": {
    "commands": {
      "postlink": "node node_modules/tom.qr-reader-extension/scripts/run.js"
    }
  }
}
Note
rnpmrefers to React Native Package Manager, used for linking native dependancies in React Native apps. The reason we run it fromnode_modulesis because extensions are bundled insidenode_modulesand since our postlink script is inside the extension, it should be run from withinnode_modules.
Create a scripts directory and make the postlink script in it: app/scripts/run.js
$ touch app/scripts/run.js
Using the react-native-link helper method from the Shoutem platform’s @shoutem/build-tools, we can easily link the package.
#file: app/scripts/run.js
const { reactNativeLink } = require('@shoutem/build-tools');

reactNativeLink('react-native-camera');
Our extension will now have access to everything react-native-camera has to offer. For this example we’ll edit app/screens/QRReaderScreen.js so that it displays an Alert when the camera reads a QR code and the alert message will contain the QR code data.
#file: app/screens/QRReaderScreen.js
import React, { Component } from 'react';
import { Alert } from 'react-native';
import Camera from 'react-native-camera';
import _ from 'lodash';

export default class QRReaderScreen extends Component {
  constructor(props) {
    super(props);
    this.onBarCodeRead = this.onBarCodeRead.bind(this);
  }

  // when camera recognizes a QR code, it will store it's content in 'code'
  // and then display an alert with the 'code' contents,
  onBarCodeRead(code) {
    Alert.alert(
      'QR Code Detected',
      code.data,
      [
        { text: 'OK, read it.', onPress: () => console.log('User saw QR Code contents.') },
      ],
      { cancelable: false },
    );
  }

  render() {
    return (
      <Camera
        onBarCodeRead={_.debounce(this.onBarCodeRead, 1000, { leading: true, trailing: false })}
        style={{ flex: 1 }}
      />
    );
  }
}
After making these changes, we can push the extension to Shoutem and install it in a new app:
$ shoutem push
Uploading `QR Reader` extension to Shoutem...
Success!
$ shoutem install --new QRReader
Extension installed
See it in browser: `https://builder.shoutem.com/app/8074`
Opening the QRReader app in the Builder will show us an app with no Screens, but since we just installed our QR Reader Extension onto the app, we can just add the QRReader screen to it by clicking on the + button next to Screens, going to the Custom category and selecting the QR Reader Extension.
This specific native dependency that we’re using (react-native-camera) is already linked in the Builder preview binary, so we will be able to preview the there. Once it finishes building and loading our QRReader app, scan a QR code, like this one, which should display the URL to WikiPedia’s English mobile main page.
With any other native dependency, previewing the app through the Builder won’t be possible, because of its predefined binary, so instead we have to preview it locally using react-native run-ios or react-native run-android.