Stay informed
Subscribe to our newsletter if you'd like to stay informed about Shoutem Extensions and Shoutem UI Toolkit.
React Native exposes plain iOS and Android native components that you can use, but there’s usually a lot of work left to do just to make them look beautiful. Instead, you can use @shoutem/ui, a set of customizable UI components. There are plenty of components that you can use out of the box.
Let’s create a list of restaurants. Start by importing UI components from the toolkit.
#file: app/screens/List.js
import React, { PureComponent } from 'react';
import { StyleSheet } from 'react-native';

import { NavigationBar } from 'shoutem.navigation';

import {
  ImageBackground,
  ListView,
  Tile,
  Title,
  Subtitle,
  Overlay,
  Screen
} from '@shoutem/ui';
Notice that you didn’t need to install the @shoutem/ui package into the app folder of your extension. That’s because this package will be installed in the extension by the app into which your extension is bundled. All packages installed by the app by default can be found in peerDependencies of app/package.json. Also, we removed View and Text from the react-native import.
We prepared some mockup restaurants data for you. Download this compressed file, extract it and copy the extracted assets folder into your app folder. The assets folder contains static restaurants data in restaurants.json.
Define a method in your List class that returns an array of restaurants.
#file: app/screens/List.js
export default class List extends PureComponent {

  getRestaurants() {
    return require('../assets/restaurants.json');
  }
Implement a render method that will use a ListView component. ListView accepts data in the form of an array to be shown in the list and renderRow is a callback function that defines how each row in the list should look.
Add the renderRow method and change the implementation of the render method:
#file: app/screens/List.js
  getRestaurants() {...}

  // defines the UI of each row in the list
  renderRow(restaurant) {
    return (
      <ImageBackground styleName="large-banner" source={{ uri: restaurant.image &&
        restaurant.image.url ? restaurant.image.url : undefined  }}>
        <Tile>
          <Title>{restaurant.name}</Title>
          <Subtitle>{restaurant.address}</Subtitle>
        </Tile>
      </ImageBackground>
    );
  }

  render() {
    return (
      <Screen>
        <NavigationBar title="RESTAURANTS" />
        <ListView
          data={this.getRestaurants()}
          renderRow={restaurant => this.renderRow(restaurant)}
        />
      </Screen>
    );
  }
Since we’ve only changed the app code now, we don’t need to upload the extension. However, in case you’re checking the changes in the Builder, do:
$ shoutem push
Uploading `Restaurants` extension to Shoutem...
Success!
The app preview will be shown after Shoutem bundles the new app. List is now showing the list of restaurants.
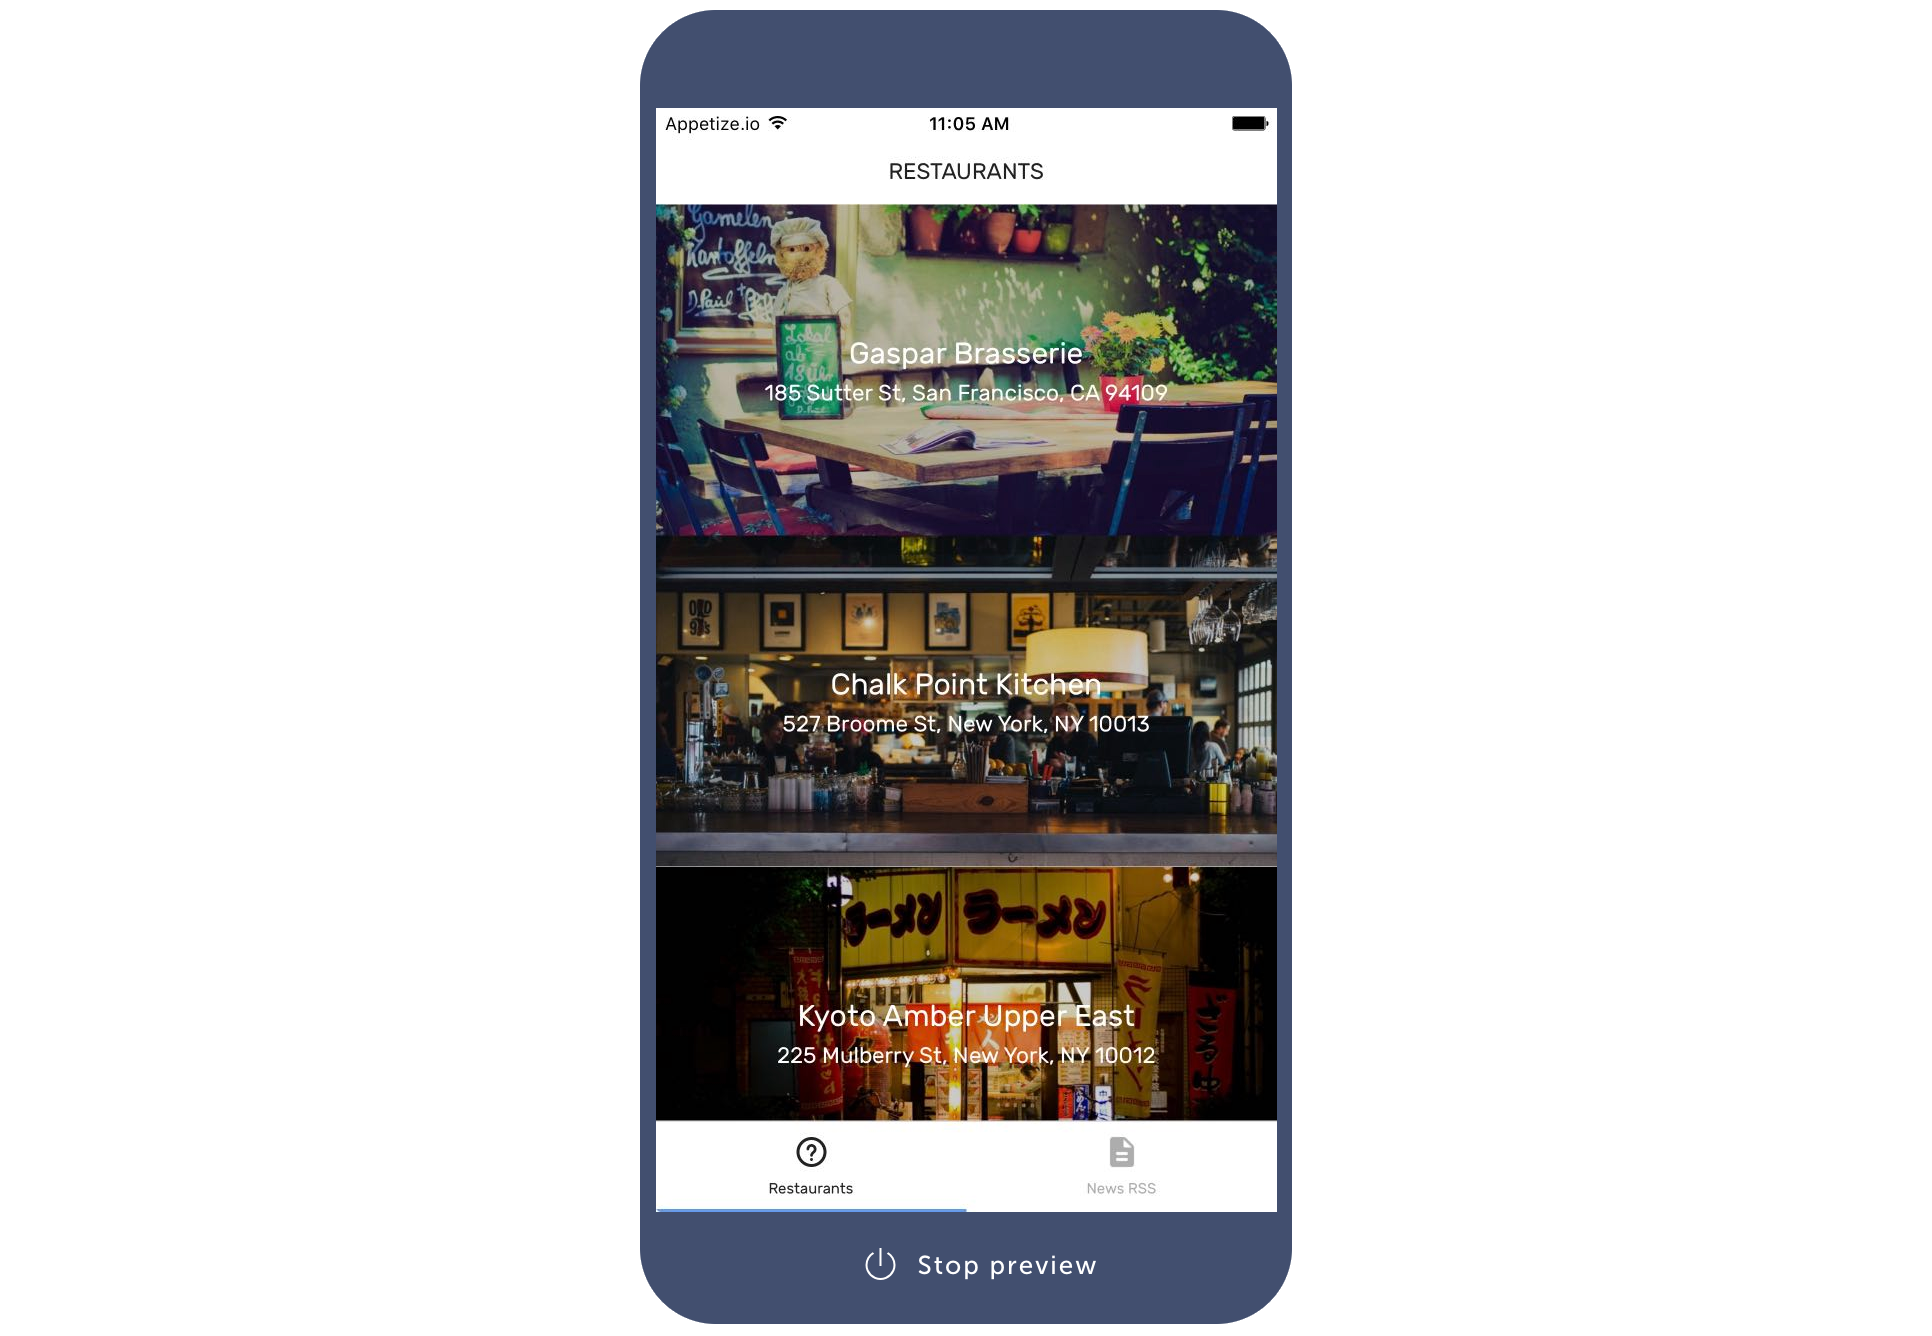
This looks exactly how we wanted.
Try clicking on a one of the restaurants. Nothing happens! We want to open up the screen with a restaurant’s details when the user touches a row in the list.
When a restaurant in the list is touched, we will open the details screen for that restaurant. To make components respond to touches, use the TouchableOpacity component from React Native. We’ll also import Shoutem’s navigateTo action creator to navigate to another screen and the ext function for the name of screen we’re navigating to.
Let’s import these things (find the complete code below):
#file: app/screens/List.js
import { TouchableOpacity } from 'react-native';

import { navigateTo } from 'shoutem.navigation';

import { ext } from '../const';
Connect navigateTo action creator to redux store.
#file: app/screens/List.js
import { connect } from 'react-redux';

export class List extends PureComponent {
  constructor(props) {
    super(props);

    // bind renderRow function to get the correct props
    this.renderRow = this.renderRow.bind(this);
  }

  getRestaurants() {...}
}

// connect screen to redux store
export default connect(
  undefined,
  { navigateTo }
)(List);
Note
Make sure that you remove the
defaultfromexport default class List extends PureComponentbecause there can only be one default export and we wantexport default connectto be it.
Now create the Details screen:
$ shoutem screen add Details
? Screen name: Details
? Create a shortcut (so that screen can be added through the Builder)? No
Success
We didn’t create a shortcut since this screen isn’t the starting screen your extension.
Open the restaurants details screen in the renderRow function. The navigateTo action creator accepts Shoutem route object as the only argument with screen (full name of screen to navigate to) and props (passed to screen) properties. To get the full name of the screen, we’ll use the ext function, which returns the full name of the extension part passed as its first argument (e.g. returns tom.restaurants.Details for Details) or the full extension name (e.g. tom.restaurants) if no argument is passed.
#file: app/screens/List.js
  renderRow(restaurant) {
    const { navigateTo } = this.props;

    return (
      <TouchableOpacity onPress={() => navigateTo({
        screen: ext('Details'),
        props: { restaurant }
      })}>
        <ImageBackground styleName="large-banner" source={{ uri: restaurant.image &&
        restaurant.image.url ? restaurant.image.url : undefined }}>
          <Tile>
            <Title>{restaurant.name}</Title>
            <Subtitle>{restaurant.address}</Subtitle>
          </Tile>
        </ImageBackground>
      </TouchableOpacity>
    );
  }
This is what you should end up with in app/screens/List.js:
#file: app/screens/List.js
import React, { PureComponent } from 'react';
import { TouchableOpacity } from 'react-native';
import { connect } from 'react-redux';

import { navigateTo, NavigationBar } from 'shoutem.navigation';

import {
  ImageBackground,
  ListView,
  Tile,
  Title,
  Subtitle,
  Overlay,
  Screen
} from '@shoutem/ui';

import { ext } from '../const';

export class List extends PureComponent {
  constructor(props) {
    super(props);

    // bind renderRow function to get the correct props
    this.renderRow = this.renderRow.bind(this);
  }

  getRestaurants() {
    return require('../assets/restaurants.json');
  }

  // defines the UI of each row in the list
  renderRow(restaurant) {
    const { navigateTo } = this.props;

    return (
      <TouchableOpacity onPress={() => navigateTo({
        screen: ext('Details'),
        props: { restaurant }
      })}>
        <ImageBackground styleName="large-banner" source={{ uri: restaurant.image &&
        restaurant.image.url ? restaurant.image.url : undefined }}>
          <Tile>
            <Title>{restaurant.name}</Title>
            <Subtitle>{restaurant.address}</Subtitle>
          </Tile>
        </ImageBackground>
      </TouchableOpacity>
    );
  }

  render() {
    return (
      <Screen>
        <NavigationBar title="RESTAURANTS" />
        <ListView
          data={this.getRestaurants()}
          renderRow={restaurant => this.renderRow(restaurant)}
        />
      </Screen>
    );
  }
}

// connect screen to redux store
export default connect(
  undefined,
  { navigateTo }
)(List);
For the Details screen just copy the following code. We’re not introducing any new concept here, just using some additional components.
#file: app/screens/Details.js
import React, { PureComponent } from 'react';
import { ScrollView } from 'react-native';

import {
  Icon,
  Row,
  Subtitle,
  Text,
  Title,
  View,
  ImageBackground,
  Divider,
  Tile,
} from '@shoutem/ui';

export default class Details extends PureComponent {
  render() {
    const { restaurant } = this.props;

    return (
      <ScrollView style = {{marginTop:-70}}>
        <ImageBackground styleName="large-portrait" source={{ uri: restaurant.image &&
        restaurant.image.url ? restaurant.image.url : undefined }}>
          <Tile>
            <Title>{restaurant.name}</Title>
            <Subtitle>{restaurant.address}</Subtitle>
          </Tile>
        </ImageBackground>

        <Row>
          <Text>{restaurant.description}</Text>
        </Row>

        <Divider styleName="line" />

        <Row>
          <Icon name="laptop" />
          <View styleName="vertical">
            <Subtitle>Visit webpage</Subtitle>
            <Text>{restaurant.url}</Text>
          </View>
          <Icon name="right-arrow" />
        </Row>

        <Divider styleName="line" />

        <Row>
          <Icon name="pin" />
          <View styleName="vertical">
            <Subtitle>Address</Subtitle>
            <Text>{restaurant.address}</Text>
          </View>
          <Icon name="right-arrow" />
        </Row>

        <Divider styleName="line" />

        <Row>
          <Icon name="email" />
          <View styleName="vertical">
            <Subtitle>Email</Subtitle>
            <Text>{restaurant.mail}</Text>
          </View>
        </Row>

        <Divider styleName="line" />
      </ScrollView>
    );
  }
}
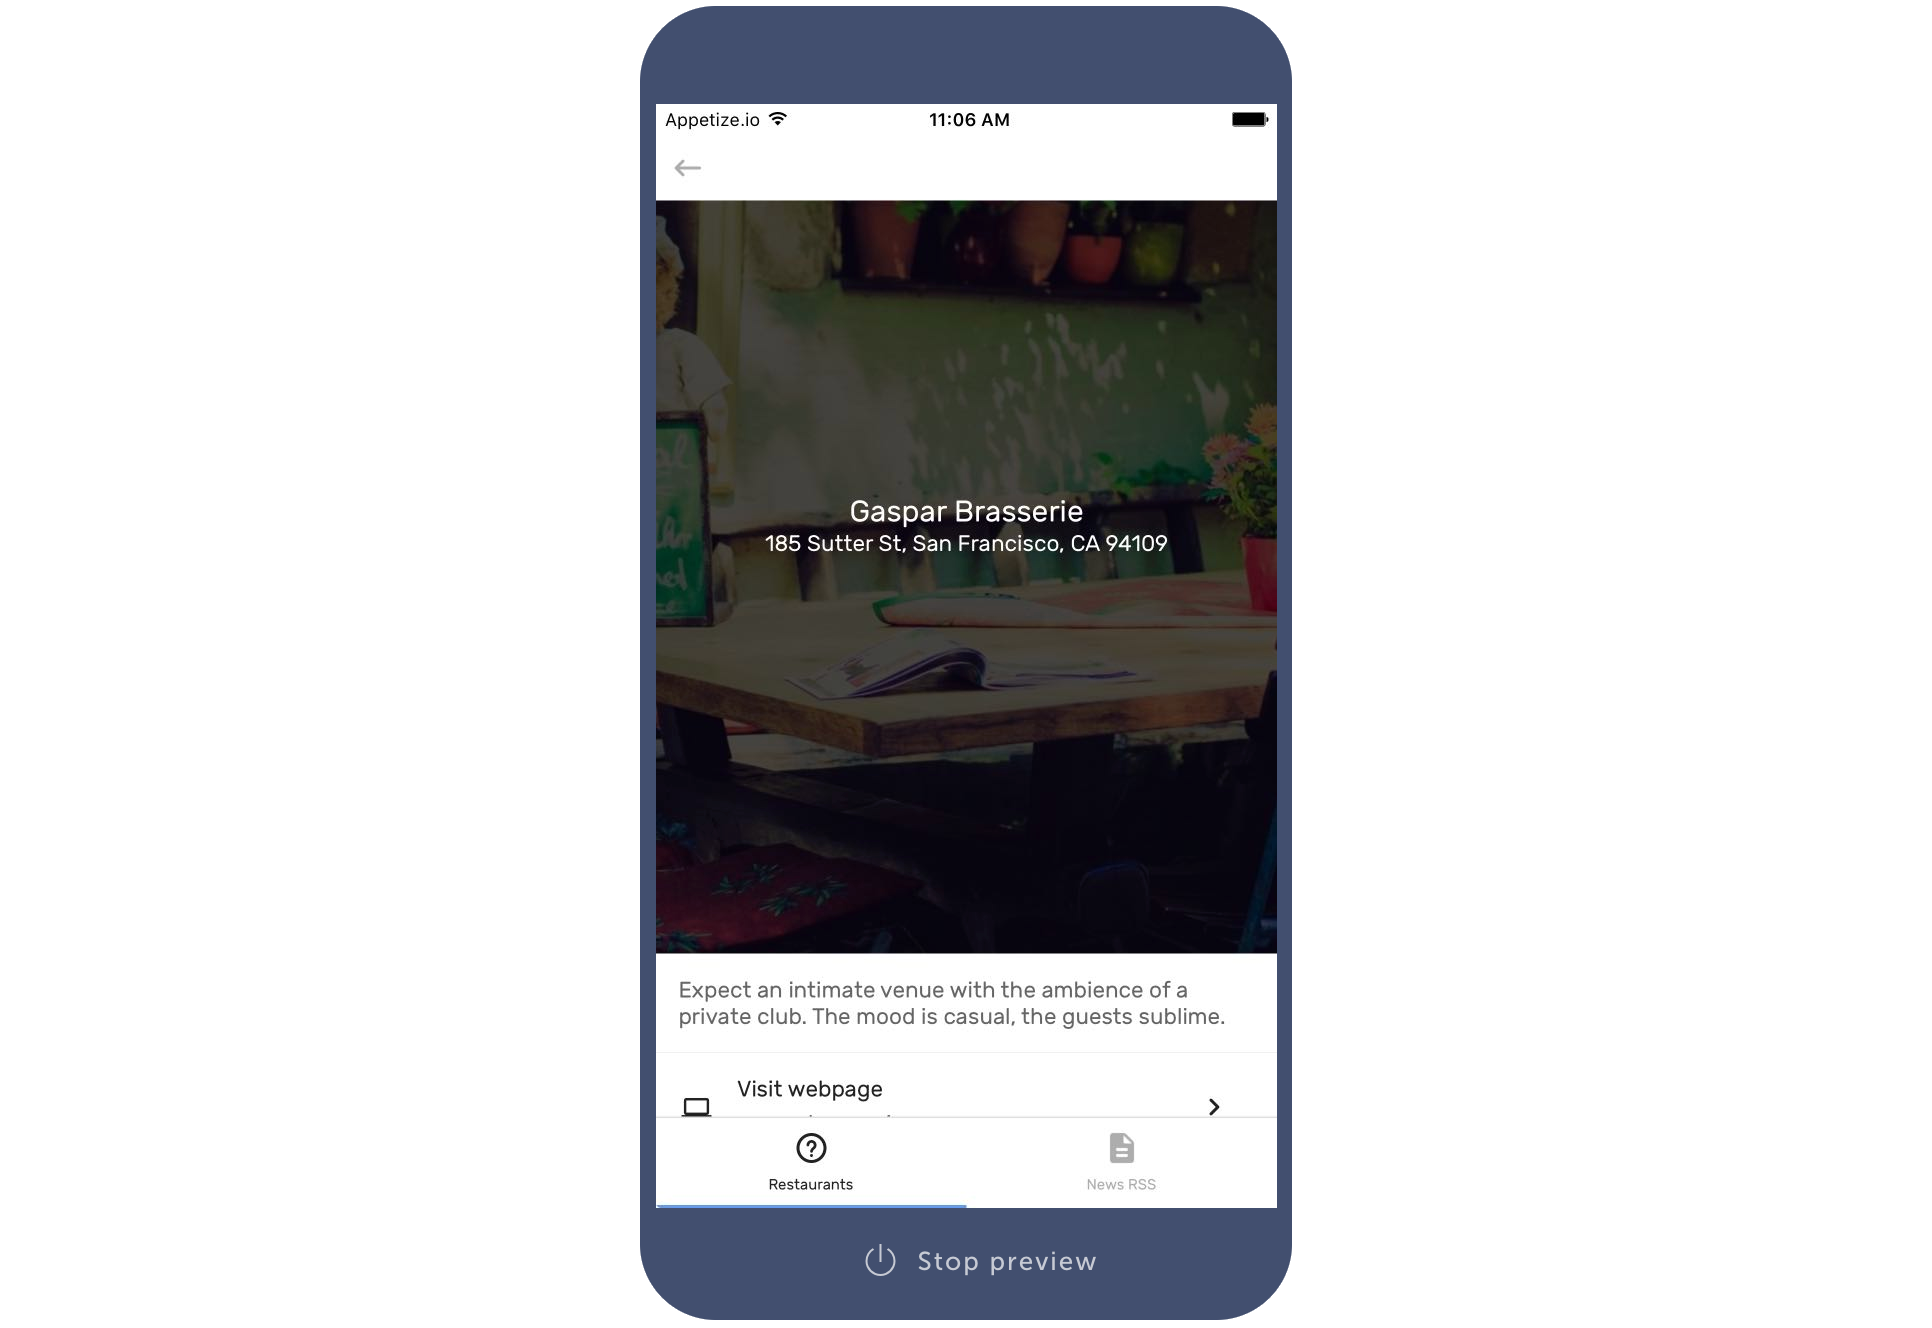
Now when you reload the app and tap on a restaurant in the list, this is what you get:
If you aren’t previewing with an emulator on your local machine, you will have to push the extension:
$ shoutem push
Uploading `Restaurants` extension to Shoutem...
Success!
Looking at the preview, that’s exactly what we wanted. However, your app is using static data. Let’s connect it to the Shoutem Cloud.