Using native API
This tutorial shows how to easily gain access to native (iOS and Android) APIs in your Shoutem extension. Most of the time when creating extensions, you’ll only use React Native writing in JavaScript. However, you can access any API of the underlying platform or a 3rd party native module.
As an example, we’ll show you how we’ve built a Shopify extension using their Mobile Buy SDK for iOS and Android. Although this is an advanced use case, as you follow the tutorial, you’ll notice just how easy it was.
Note
Before we start, you might want to read the excellent official guides on how to write native modules for iOS and Android, since this tutorial relies on these concepts. Make sure you’ve read Getting started with Shoutem extensions too.
There are 3 cases for accessing native APIs from your extension:
-
Exposing native methods to JavaScript: This is the simplest case for which you just need to follow the React Native’s official guides mentioned above.
-
Using a 3rd party SDK (e.g. for Shopify or Firebase): This is the case we’ll describe in more detail. To use the SDK, you’ll need to find an existing React Native bridge that already exposes its methods to JavaScript, or create one on your own. The same principles apply when it comes to integrating the bridge with Shoutem.
-
Requiring mobile permissions (e.g. push notifications, location, etc.): You’ll need to write a script that modifies the Shoutem application’s project files. We’re working on a guide on how to do this meanwhile improving the process.
Creating a Shopify extension
Shopify lets you create and manage an online store. Merchants all over the world use it to grow their business, and many of them want to have their stores accessible from mobile apps. Shopify’s Mobile Buy SDK for iOS and Android helps developers integrate a store into an app.
Shoutem’s Shopify extension lets customers browse and buy products through a mobile app built with Shoutem. All that a store owner needs to do is enter his API key in extension settings.
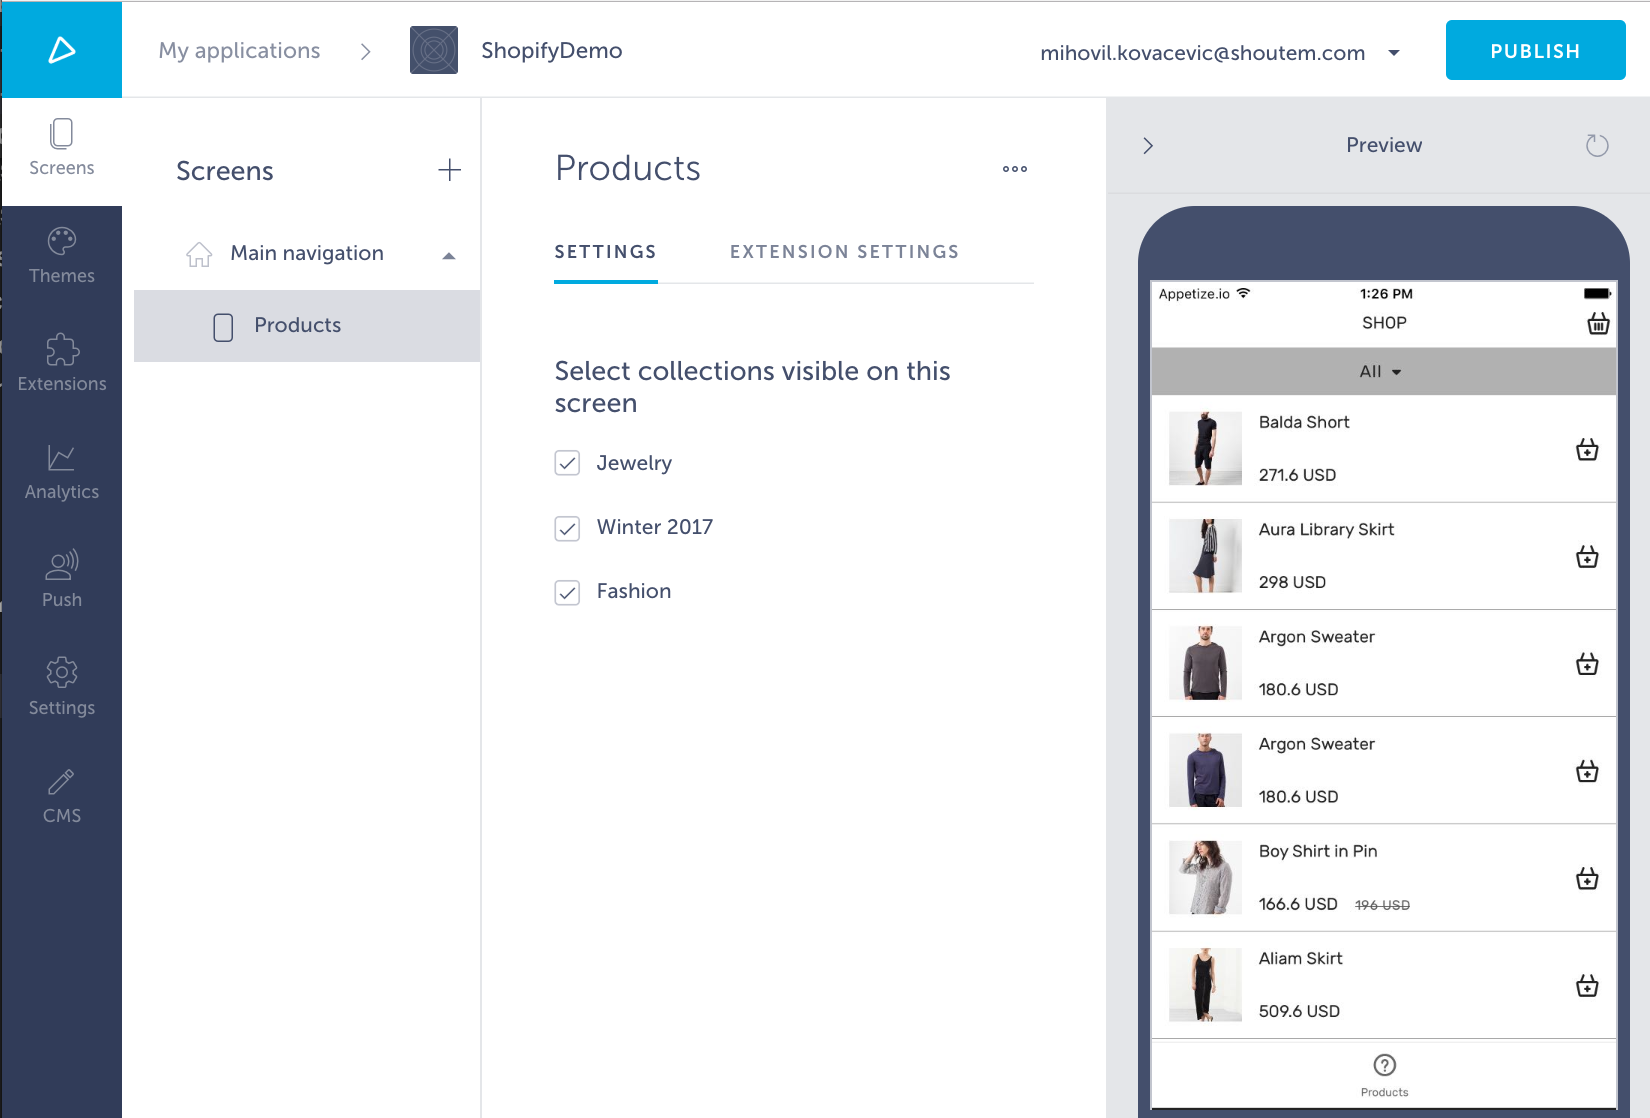
The result of this tutorial is a Shopify store within an app built with Shoutem:

We won’t go into the detail of managing the store’s logic.
Creating a React Native bridge for Shopify’s SDK
To use Shopify’s Mobile Buy SDK in our JavaScript code, we need to create a React Native bridge. There wasn’t one available so we built and open sourced our own. When needing to create React Native bridge, you have two options:
- Embedding the bridge in your extension
- Creating the bridge as a separate module and referring to it as a dependency from the extension
Latter is recommended as it keeps your extension focused on consuming the SDK’s API, separates responsibilities and lets other developers use your bridge in their projects.
Note
Creating a bridge is time-consuming and error-prone process, but there is a great tool that helps you use JavaScript with native code.
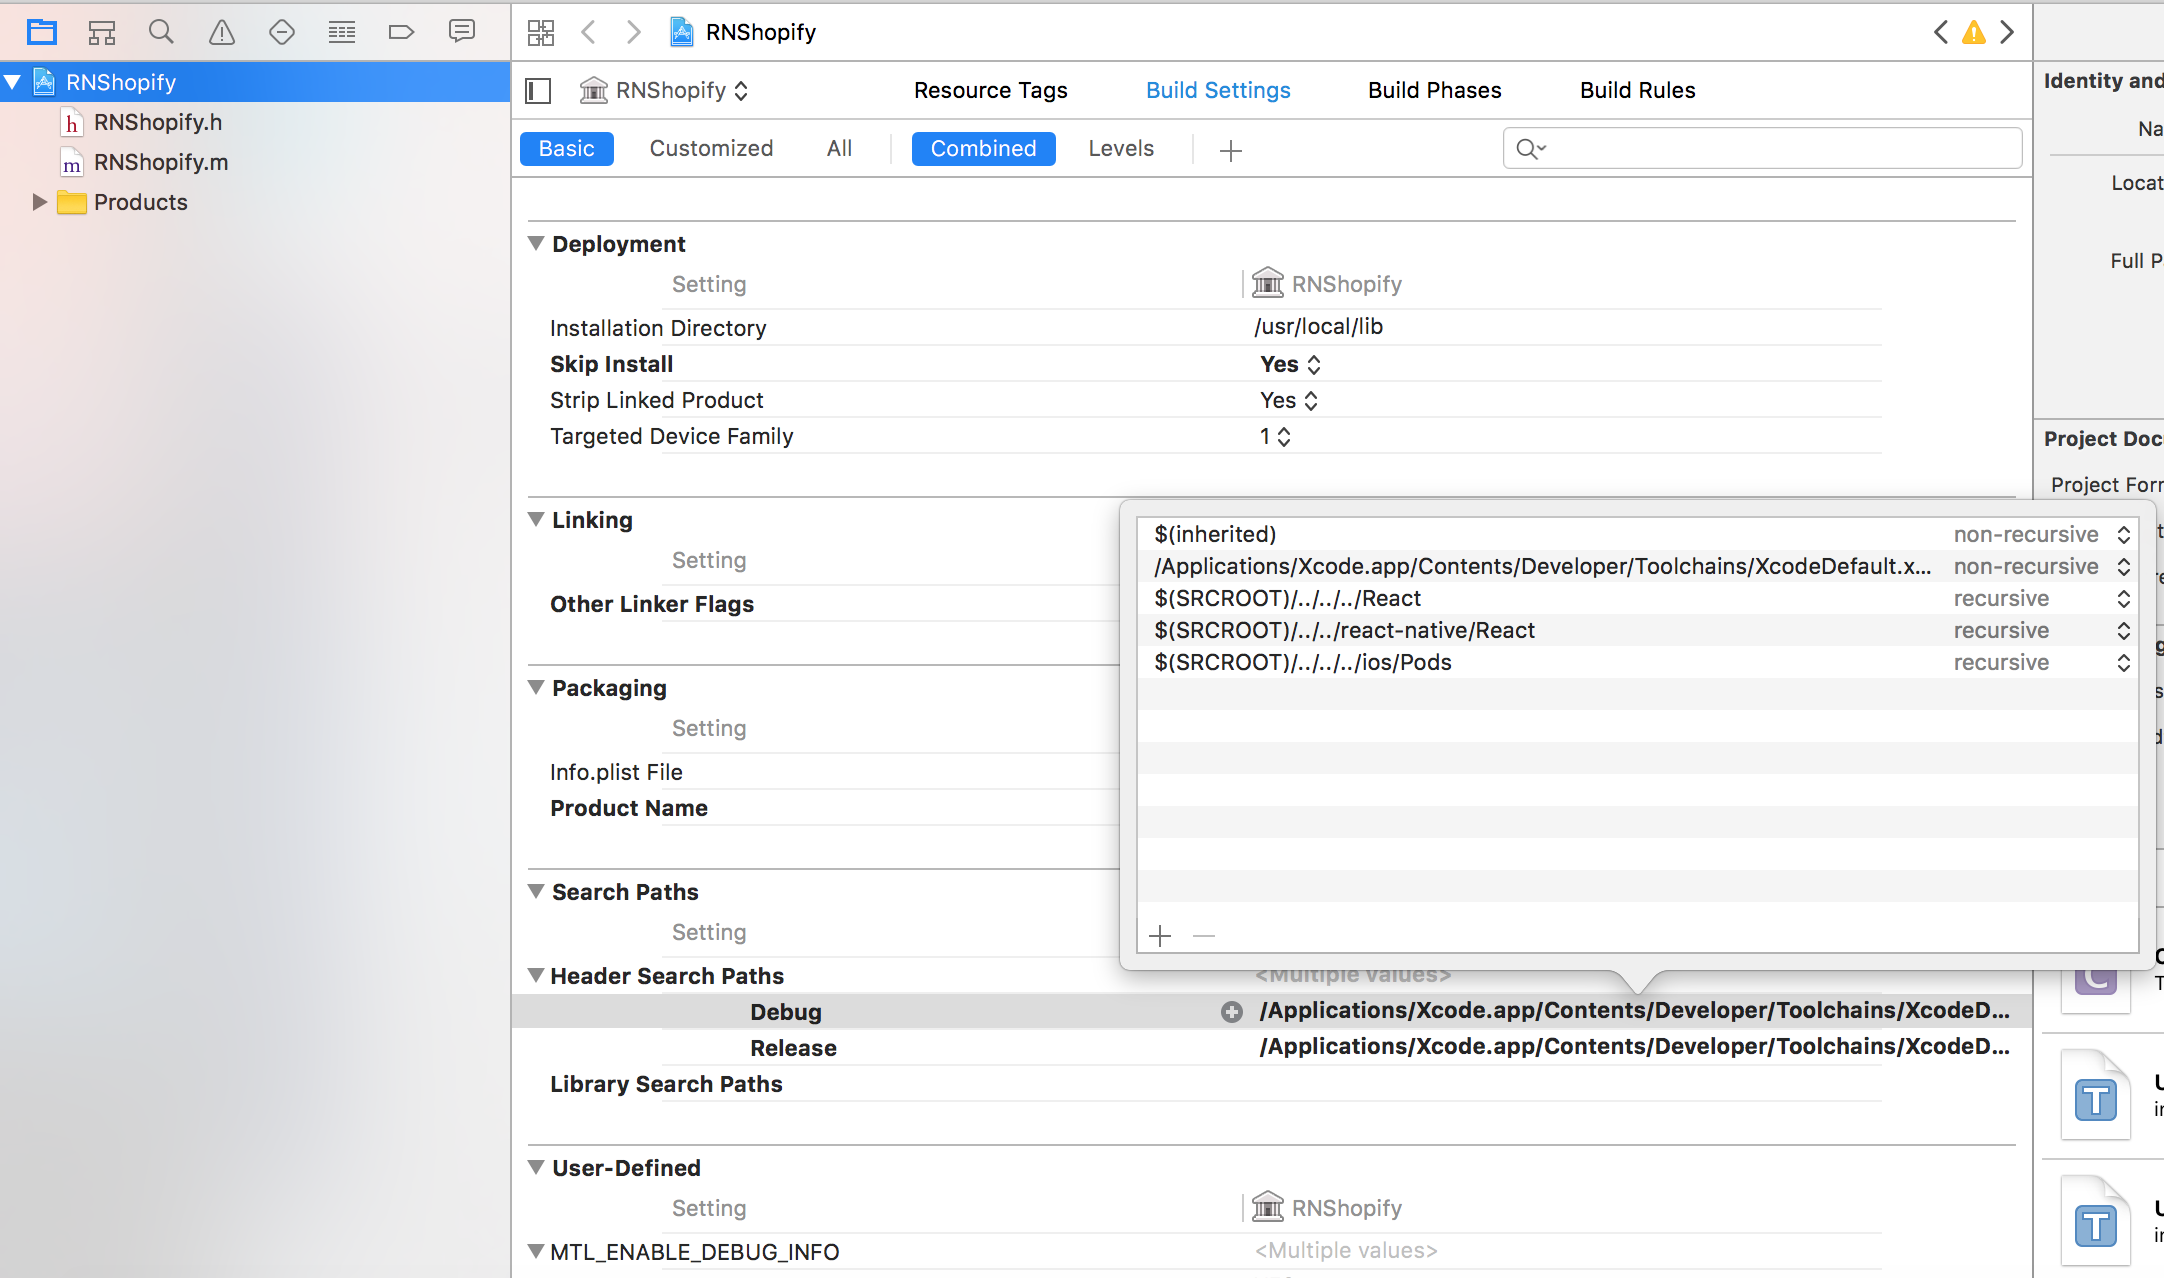
Use CocoaPods the dependency management system for iOS, to install Mobile Buy SDK for iOS. iOS application will install the native dependency Pod in their ios/Pods folder. To have your bridge see this native code, set its Header Search Paths in Build Settings of your bridge’s .xcodeproj. To reference the application’s Pods folder from the bridge’s ios folder, reference the current directory with the $SRCROOT variable in XCode, and then refer to the application’s Pods folder. The result should look like this:
$(SRCROOT)/../../../ios/Pods
Set this path for both the Debug and Release builds, and mark it as recursive. The following picture shows how this setting looks like for the Shopify bridge when viewed in XCode:

Including the bridge in our Shopify extension
There are 3 steps you need to take before using the bridge in your extension.
First, add it as a dependency to your extension’s package.json, in the app folder.
Then, link all the bridge’s native code to the end package.json. With Shoutem, you do this by using an rnpm postlink command in package.json. Invoke the react-native link command for every native dependency. Shoutem’s build process will execute it after it installs all dependencies for all extensions.
This is how our Shopify extension’s package.json looks like after these two steps:
#file: app/package.json
{
  "name": "shoutem.shopify",
  "version": "0.0.1",
  "description": "Shopify extension",
  "dependencies": {
    "react-native-shopify": "0.0.1-alpha.0"
  },
  "rnpm": {
    "commands": {
      "postlink": "react-native link react-native-shopify"
    }
  }
}
You can only execute a single command with rnpm postlink. For linking more than one native library, use an execution script, as shown below:
#file: app/package.json
"postlink": "node node_modules/shoutem.shopify/scripts/run.js"
Note
Shoutem installs extensions as node modules. This is why you need to prepend
node_modules/{extension name}to the script path.
The Shopify extension uses a React Native library react-native-search-bar that wraps the iOS native search bar. Since there are two libraries we need to link, we wrote the following run script, which you can change and reuse in your extension:
const exec = require('child_process').execSync;

const dependenciesToLink = ['react-native-shopify', 'react-native-search-bar'];

const command = 'react-native link';

dependenciesToLink.forEach((dependency) => {
  exec(`${command} ${dependency}`);
});
Note
We used Node’s synchronous API because the asynchronous version causes the build to hang forever in some situations.
The last step is to include the SDKs from Shopify, which do the heavy lifting on the native side.
Referencing a 3rd party SDK
The best practice when creating wrappers around native libraries is to let the application itself manage the dependencies. Shoutem extension is a module within a larger Shoutem application which is responsible for dependency management.
On Android, things are straightforward because you specify native dependencies in build.gradle and install them as part of the build process. Native modules for iOS need an extra step but Shoutem makes this easy.
Shoutem treats an extension’s iOS aspect as a Pod and lets it specify a .podspec file where it can declare its dependencies. At a build time, Shoutem application dynamically includes all native iOS dependencies declared by its extensions in one Podfile.
The example below shows how the Shopify extension declares its Mobile Buy SDK dependency:
#file: ShoutemShopify.podspec
Pod::Spec.new do |s|

  s.name         = "ShoutemShopify"
  s.version      = "1.0"
  s.summary      = "A Shopify extension for Shoutem."

  s.description  = "The Shopify extension enables store owners to make money by selling
                    products in Shoutem applications."

  s.homepage     = "http://www.shoutem.com"
  s.platform     = :ios

  s.license      = { :type => "MIT" }

  s.author       = "Shoutem"

  s.source       = { :path => "" }

  s.exclude_files = "Classes/Exclude"

  # s.public_header_files = "Classes/**/*.h"

  s.dependency  'Mobile-Buy-SDK', '2.2.0'

end
This is how will the Shoutem application Podfile look like after the build process:
#file: Podfile
target 'ShoutemApp' do
  # Uncomment this line if you're using Swift or would like to use dynamic frameworks
  use_frameworks!

  pod 'ShoutemShopify', :path => '../node_modules/shoutem.shopify/ShoutemShopify.podspec'

  target 'ShoutemAppTests' do
    inherit! :search_paths
    # Pods for testing
  end

end
After you build the application, a native dependency will be available to any bridge that wraps it and thus to JavaScript code.
Calling the SDK’s methods from JavaScript
Once you have your bridge and its native dependencies installed, you can use it as any other JavaScript module. Let’s use Shopify’s SDK to fetch shop information and use it in our extension:
import { getExtensionSettings } from 'shoutem.application';
import Shopify from 'react-native-shopify';

import {
  shopLoaded,
  shopErrorLoading,
} from './redux/actionCreators';

import { ext } from './const';

export function appDidMount(app) {
  const store = app.getStore();
  const { dispatch } = store;
  const state = store.getState();

  const { store: shopifyStore, apiKey } = getExtensionSettings(state, ext());

  Shopify.initialize(shopifyStore, apiKey);

  return Shopify.getShop()
  .then(shop) => {
    dispatch(shopLoaded(collections, shop, tags));
  })
  .catch((error) => {
    console.log(error);
    dispatch(shopErrorLoading());
  });
}
Requiring user permissions and other advanced use cases
As mentioned in the introduction, sometimes you’ll need to support advanced use cases and change core project files. This can mean changing the application’s xcode.project or build.gradle files, AndroidManifest.xml, or even AppDelegate and MainActivity. With the help of Node’s filesystem modules and 3rd party libraries such as xcode, you can do just about anything.
We’re working on a more developer friendly system for common use cases, which we’ll describe in detail. For now, with some Node scripting, you can meet any goal in your custom extension, although with some extra effort.