Stay informed
Subscribe to our newsletter if you'd like to stay informed about Shoutem Extensions and Shoutem UI Toolkit.
In this tutorial, we’ll show you how to create React Settings pages for both shortcut settings and extension settings pages.
First, let’s make an extension to work with. We’ll make a simple Hello World! example so we can easily cover the basic concepts.
$ shoutem init react-hello-world
Enter information about your extension. Press `return` to accept (default) values.
? Title React Hello World
? Version 0.0.1
? Description Learning React settings pages.
...
Extension initialized.
We need to add a screen with a shortcut, so we have a shortcut to add settings pages to. Locate to the extension folder:
cd tom.html-hello-world
And add the screen:
$ shoutem screen add Hello
? Screen name: Hello
? Create a shortcut (so that screen can be added through the Builder)? Yes
? Shortcut name: Hello
? Shortcut title: Hello
? Shortcut description: A shortcut for Hello
...
Success
Now let’s create the actual settings page:
$ shoutem page add HelloWorldShortcutPage
? Page type: react
? Page name: HelloWorldShortcutPage
? Page title: Hello World Shortcut Page
? This settings page controls settings for: an existing screen
? Select existing screen: Hello
...
React settings page added to pages/hello-world-shortcut-page
HelloWorldShortcutPage was also added to extension.json as an adminPage of the Hello shortcut and as one of the pages of the extension:
#file: extension.json
"shortcuts": [
  {
    "name": "Hello",
    "title": "Hello",
    "description": "A shortcut for Hello",
    "screen": "@.Hello",
    "adminPages": [
      {
        "page": "@.HelloWorldShortcutPage",
        "title": "Hello World Shortcut Page"
      }
    ]
  }
],
"pages": [
  {
    "name": "HelloWorldShortcutPage",
    "type": "react-page"
  }
]
This is the server folder structure:
server/
| bin/
├ node_modules/
├ src
|   ├ pages/
|   |  └ hello-world-shortcut-page
|   |    ├ index.js
|   |    ├ HelloWorldShortcutPage.jsx
|   |    └ style.css
|   ├ const.js
|   ├ extension.js
|   └ index.js
└ package.json
It contains bin and src folders. The bin folder holds core react settings pages code and the webpack config, there shouldn’t be any need to modify it. The src folder contains your extension’s settings pages code divided into separate folders inside the pages folder. It also contains the index.js file where you export extension functionalities, and the extension.js file which is managed by the Shoutem CLI.
As you can see, HelloWorldShortcutPage is added under src/pages/hello-world-shortcut-page folder. Inside is a React component HelloWorldShortcutPage.jsx that implements a shortcut settings page. It’s a starting template that shows you how to manage shortcut settings with a simple input field.
The template contains ordinary React lib with an addition of Shoutem libraries.
#file: server/src/pages/hello-world-shortcut-page/HelloWorldShortcutPage.jsx
import React, { Component, PropTypes } from 'react';
import {
  Button,
  ButtonToolbar,
  ControlLabel,
  FormControl,
  FormGroup,
  HelpBlock,
} from 'react-bootstrap';
import { LoaderContainer } from '@shoutem/react-web-ui';
import {
  fetchShortcut,
  updateShortcutSettings,
  getShortcut,
} from '@shoutem/redux-api-sdk';
import { shouldRefresh } from '@shoutem/redux-io';
import { connect } from 'react-redux';
import './style.scss';
It uses:
fetchShortcut(shortcutId) - action for fetching shortcut resourceupdateShortcutSettings(shortcut, settingsPatch) - action for updating shortcut settings resourcegetShortcut(state, shortcutId) - selector for selecting shortcut from stateBefore diving into an explanation of the HelloWorldShortcutPage React component, let’s see what it receives in props. It receives props passed from the parent core component and from connect that binds React component to the Redux store.
#file: server/pages/hello-world-shortcut-page/HelloWorldShortcutPage.jsx
function mapStateToProps(state, ownProps) {
  const { shortcutId } = ownProps;

  return {
    shortcut: getShortcut(state, shortcutId),
  };
}

function mapDispatchToProps(dispatch, ownProps) {
  const { shortcutId } = ownProps;

  return {
    fetchShortcut: () => dispatch(fetchShortcut(shortcutId)),
    updateShortcutSettings: (shortcut, settings) => (
      dispatch(updateShortcutSettings(shortcut, settings))
    ),
  };
}

export default connect(mapStateToProps, mapDispatchToProps)(HelloWorldShortcutPage);
The parent component passes a scope of information to the settings page depending on the context in which the settings page is rendered. Basically, it passes extensionName, shortcutId, screenId and parameters from extension definition. In mapStateToProps and mapDispatchToProps we prepare props for managing shortcut resources and you are open to add your props as you would in typical React development.
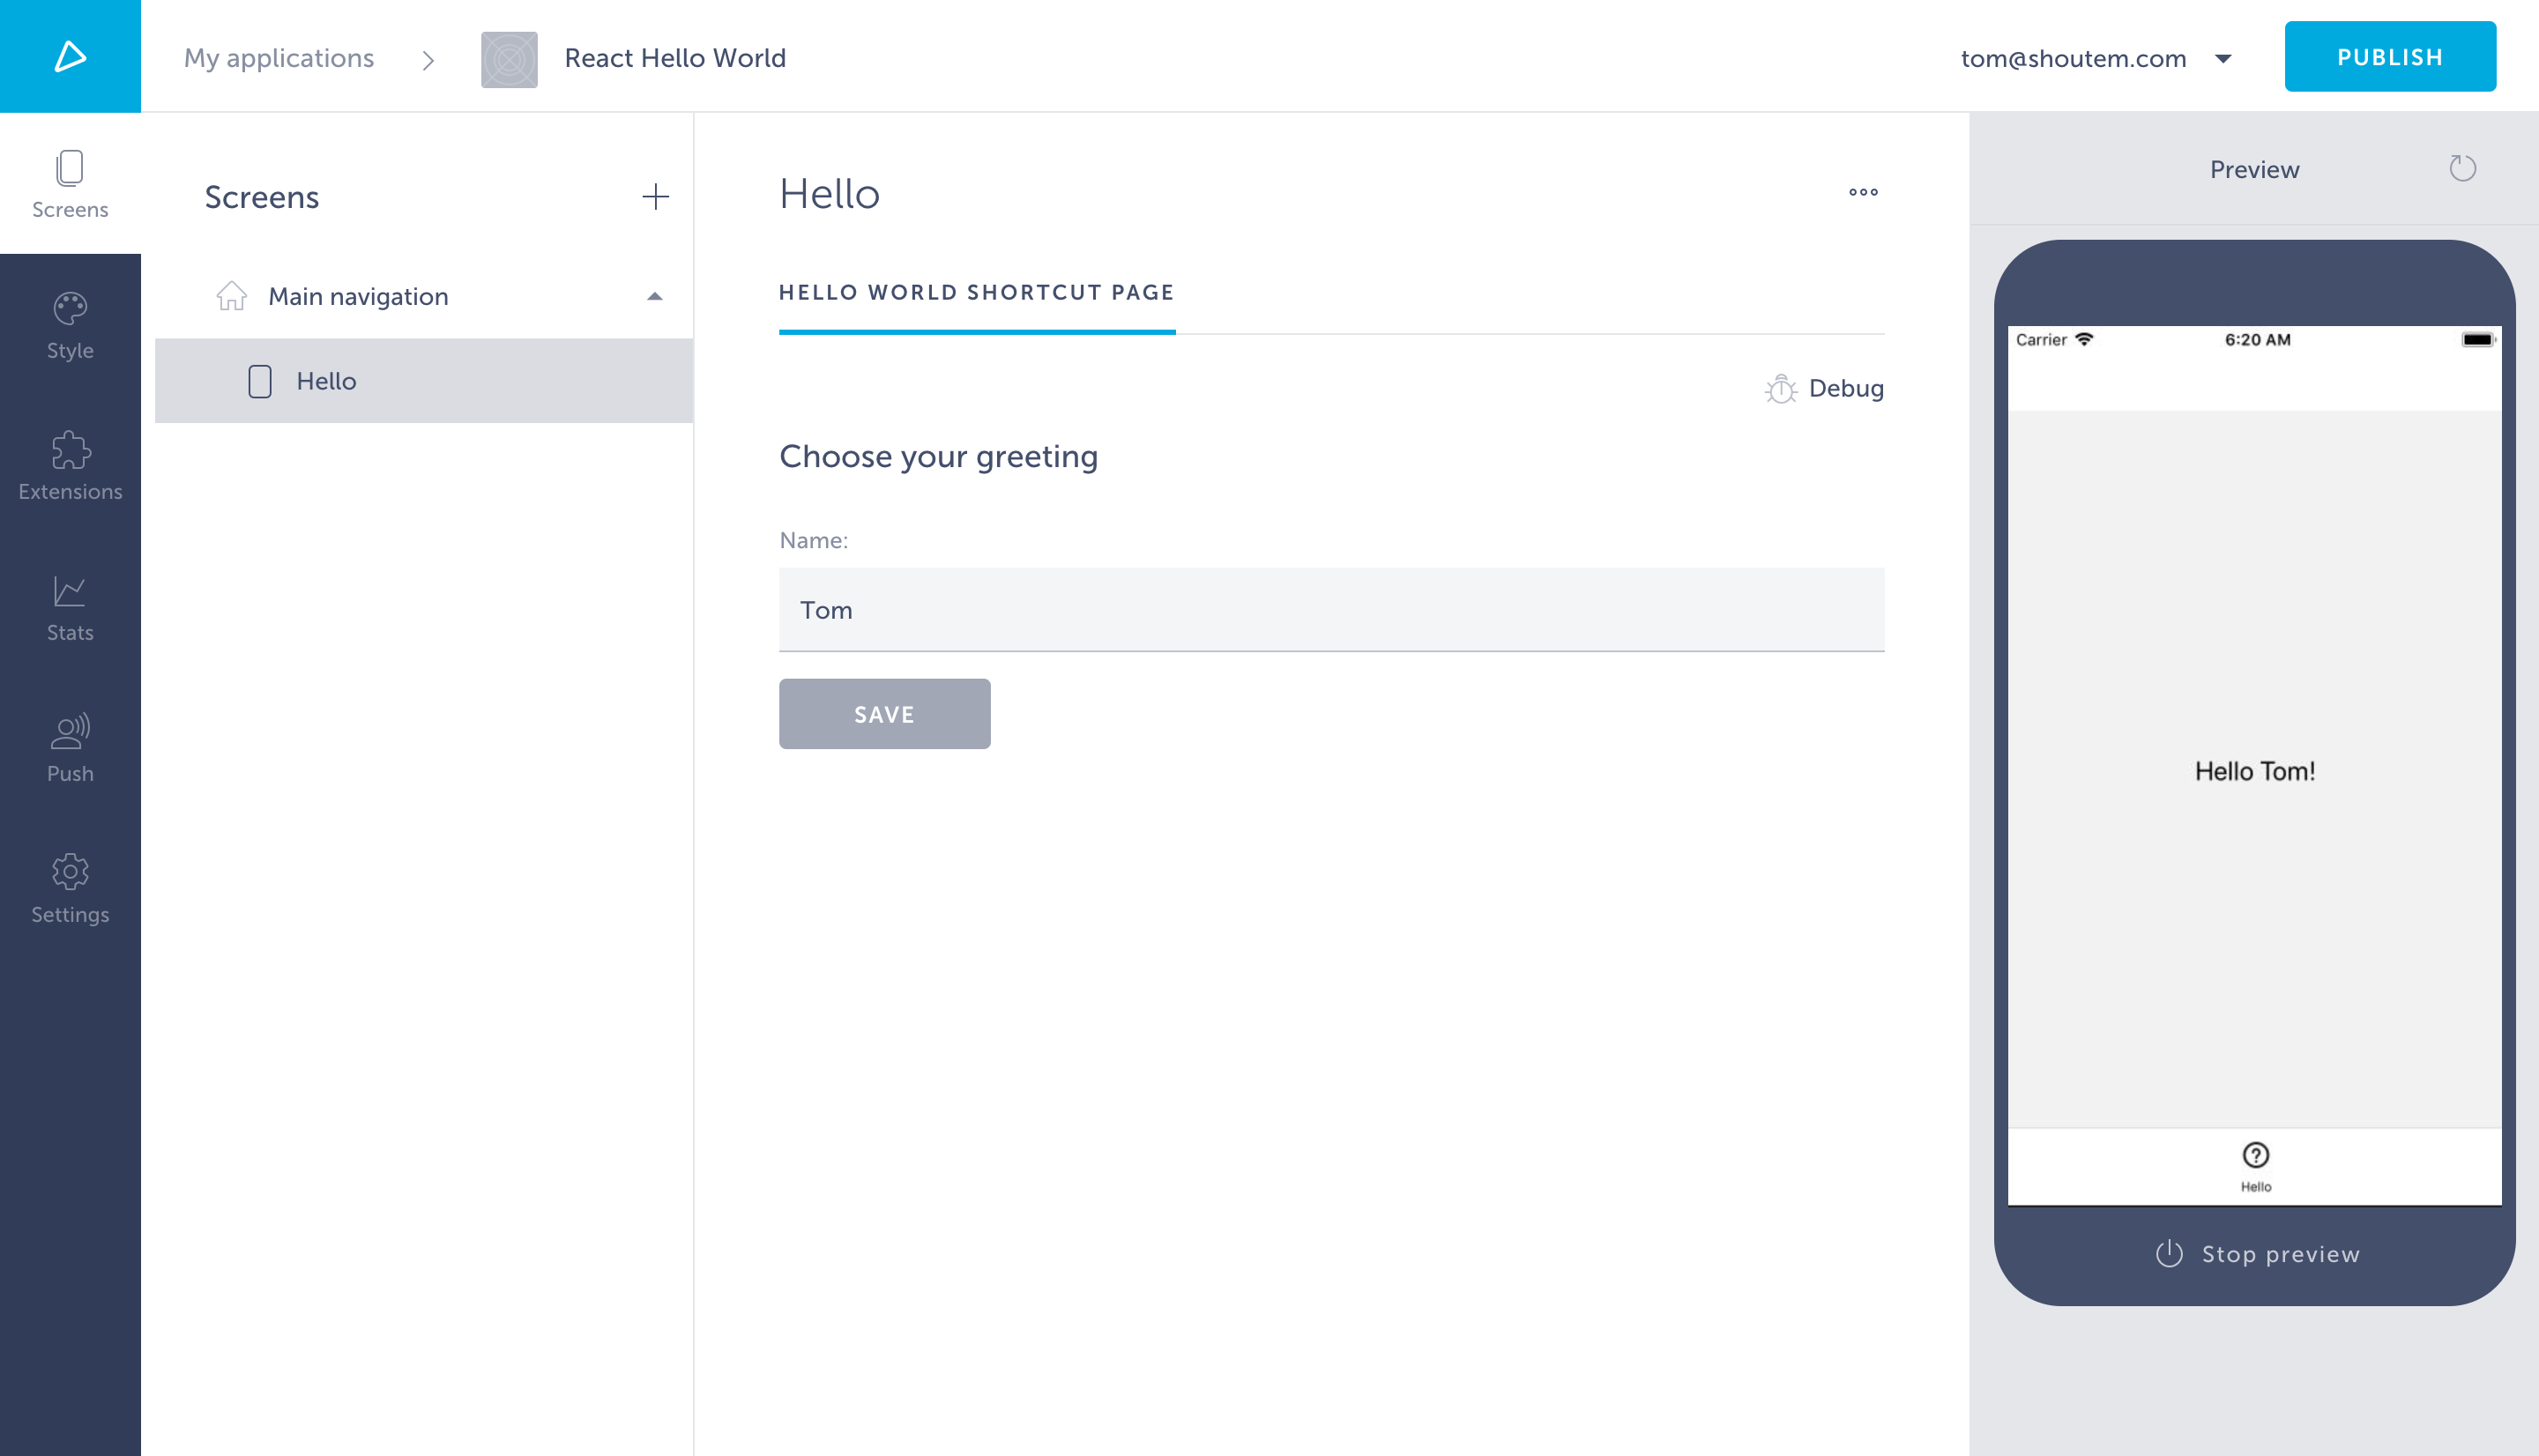
Now we can focus on the HelloWorldShortcutPage React component that contains the same concepts as any other React component. Particularly, the component renders an input field and a Save button for managing a greeting in shortcut settings.
#file: server/pages/hello-world-shortcut-page/HelloWorldShortcutPage.jsx
class HelloWorldShortcutPage extends Component {
  static propTypes = {
    shortcut: PropTypes.object,
    fetchShortcut: PropTypes.func,
    updateShortcutSettings: PropTypes.func,
  };

  constructor(props) {
    super(props);

    this.handleTextChange = this.handleTextChange.bind(this);
    this.handleSave = this.handleSave.bind(this);
    this.handleSubmit = this.handleSubmit.bind(this);

    props.fetchShortcut();

    this.state = {
      error: null,
      greeting: _.get(props.shortcut, 'settings.greeting'),
      // flag indicating if value in input field is changed
      hasChanges: false,
    };
  }

  componentWillReceiveProps(nextProps) {
    const { shortcut } = this.props;
    const { shortcut: nextShortcut } = nextProps;
    const { greeting } = this.state;

    if (_.isEmpty(greeting)) {
      this.setState({
        greeting: _.get(nextShortcut, 'settings.greeting'),
      });
    }

    if (shortcut !== nextShortcut && shouldRefresh(nextShortcut)) {
      this.props.fetchShortcut();
    }
  }

  handleTextChange(event) {
    this.setState({
      greeting: event.target.value,
      hasChanges: true,
    });
  }

  handleSubmit(event) {
    event.preventDefault();
    this.handleSave();
  }

  handleSave() {
    const { shortcut } = this.props;
    const { greeting } = this.state;

    this.setState({ error: '', inProgress: true });
    this.props.updateShortcutSettings(shortcut, { greeting })
      .then(() => (
        this.setState({ hasChanges: false, inProgress: false })
      )).catch((err) => {
        this.setState({ error: err, inProgress: false });
      });
  }

  render() {
    const { error, hasChanges, inProgress, greeting } = this.state;

    return (
      <div className="hello-page settings-page">
        <form onSubmit={this.handleSubmit}>
          <FormGroup>
            <h3>Choose your greeting</h3>
            <ControlLabel>Name:</ControlLabel>
            <FormControl
              type="text"
              className="form-control"
              value={greeting}
              onChange={this.handleTextChange}
            />
          </FormGroup>
          {error &&
            <HelpBlock className="text-error">{error}</HelpBlock>
          }
        </form>
        <ButtonToolbar>
          <Button
            bsStyle="primary"
            disabled={!hasChanges}
            onClick={this.handleSave}
          >
            <LoaderContainer isLoading={inProgress}>
              Save
            </LoaderContainer>
          </Button>
        </ButtonToolbar>
      </div>
    );
  }
}
You will notice how we trigger shortcut loading, reading the greeting value and updating it on Shoutem API once the user clicks the Save button. You are free to customize it in any way you need, implementing new React components and importing them into this file.
This page is now created and referenced in the Hello shortcut in extension.json. Let’s add our greeting setting to it and give it a default value:
#file: extension.json
"shortcuts": [
  {
    "name": "Hello",
    "title": "Hello",
    "description": "A shortcut for Hello",
    "screen": "@.Hello",
    "adminPages": [
      {
        "page": "@.HelloWorldShortcutPage",
        "title": "Hello World Shortcut Page"
      }
    ],
    "settings": {
      "greeting": "Tom"
    }
  }
]
The Shoutem CLI implemented the shortcut settings page into our pre-existing shortcut, all that is left to do is to access the settings in the Hello screen. Update the screen file:
#file: app/screens/Hello.js
export default class Hello extends Component {
  render() {
    const { shortcut } = this.props;
    const { greeting } = shortcut.settings;

    return (
      <View style={styles.container}>
        <Text style={styles.text}>Hello {greeting}!</Text>
      </View>
    );
  }
}
Now let’s publish and install the extension.
$ shoutem push
Uploading React Hello World extension to Shoutem...
Success!
$ shoutem install --new "React Hello World"
Extension installed
See it in browser: https://builder.shoutem.com/8074
Our default setting applies and the app owner has an input form to change the greeting value.
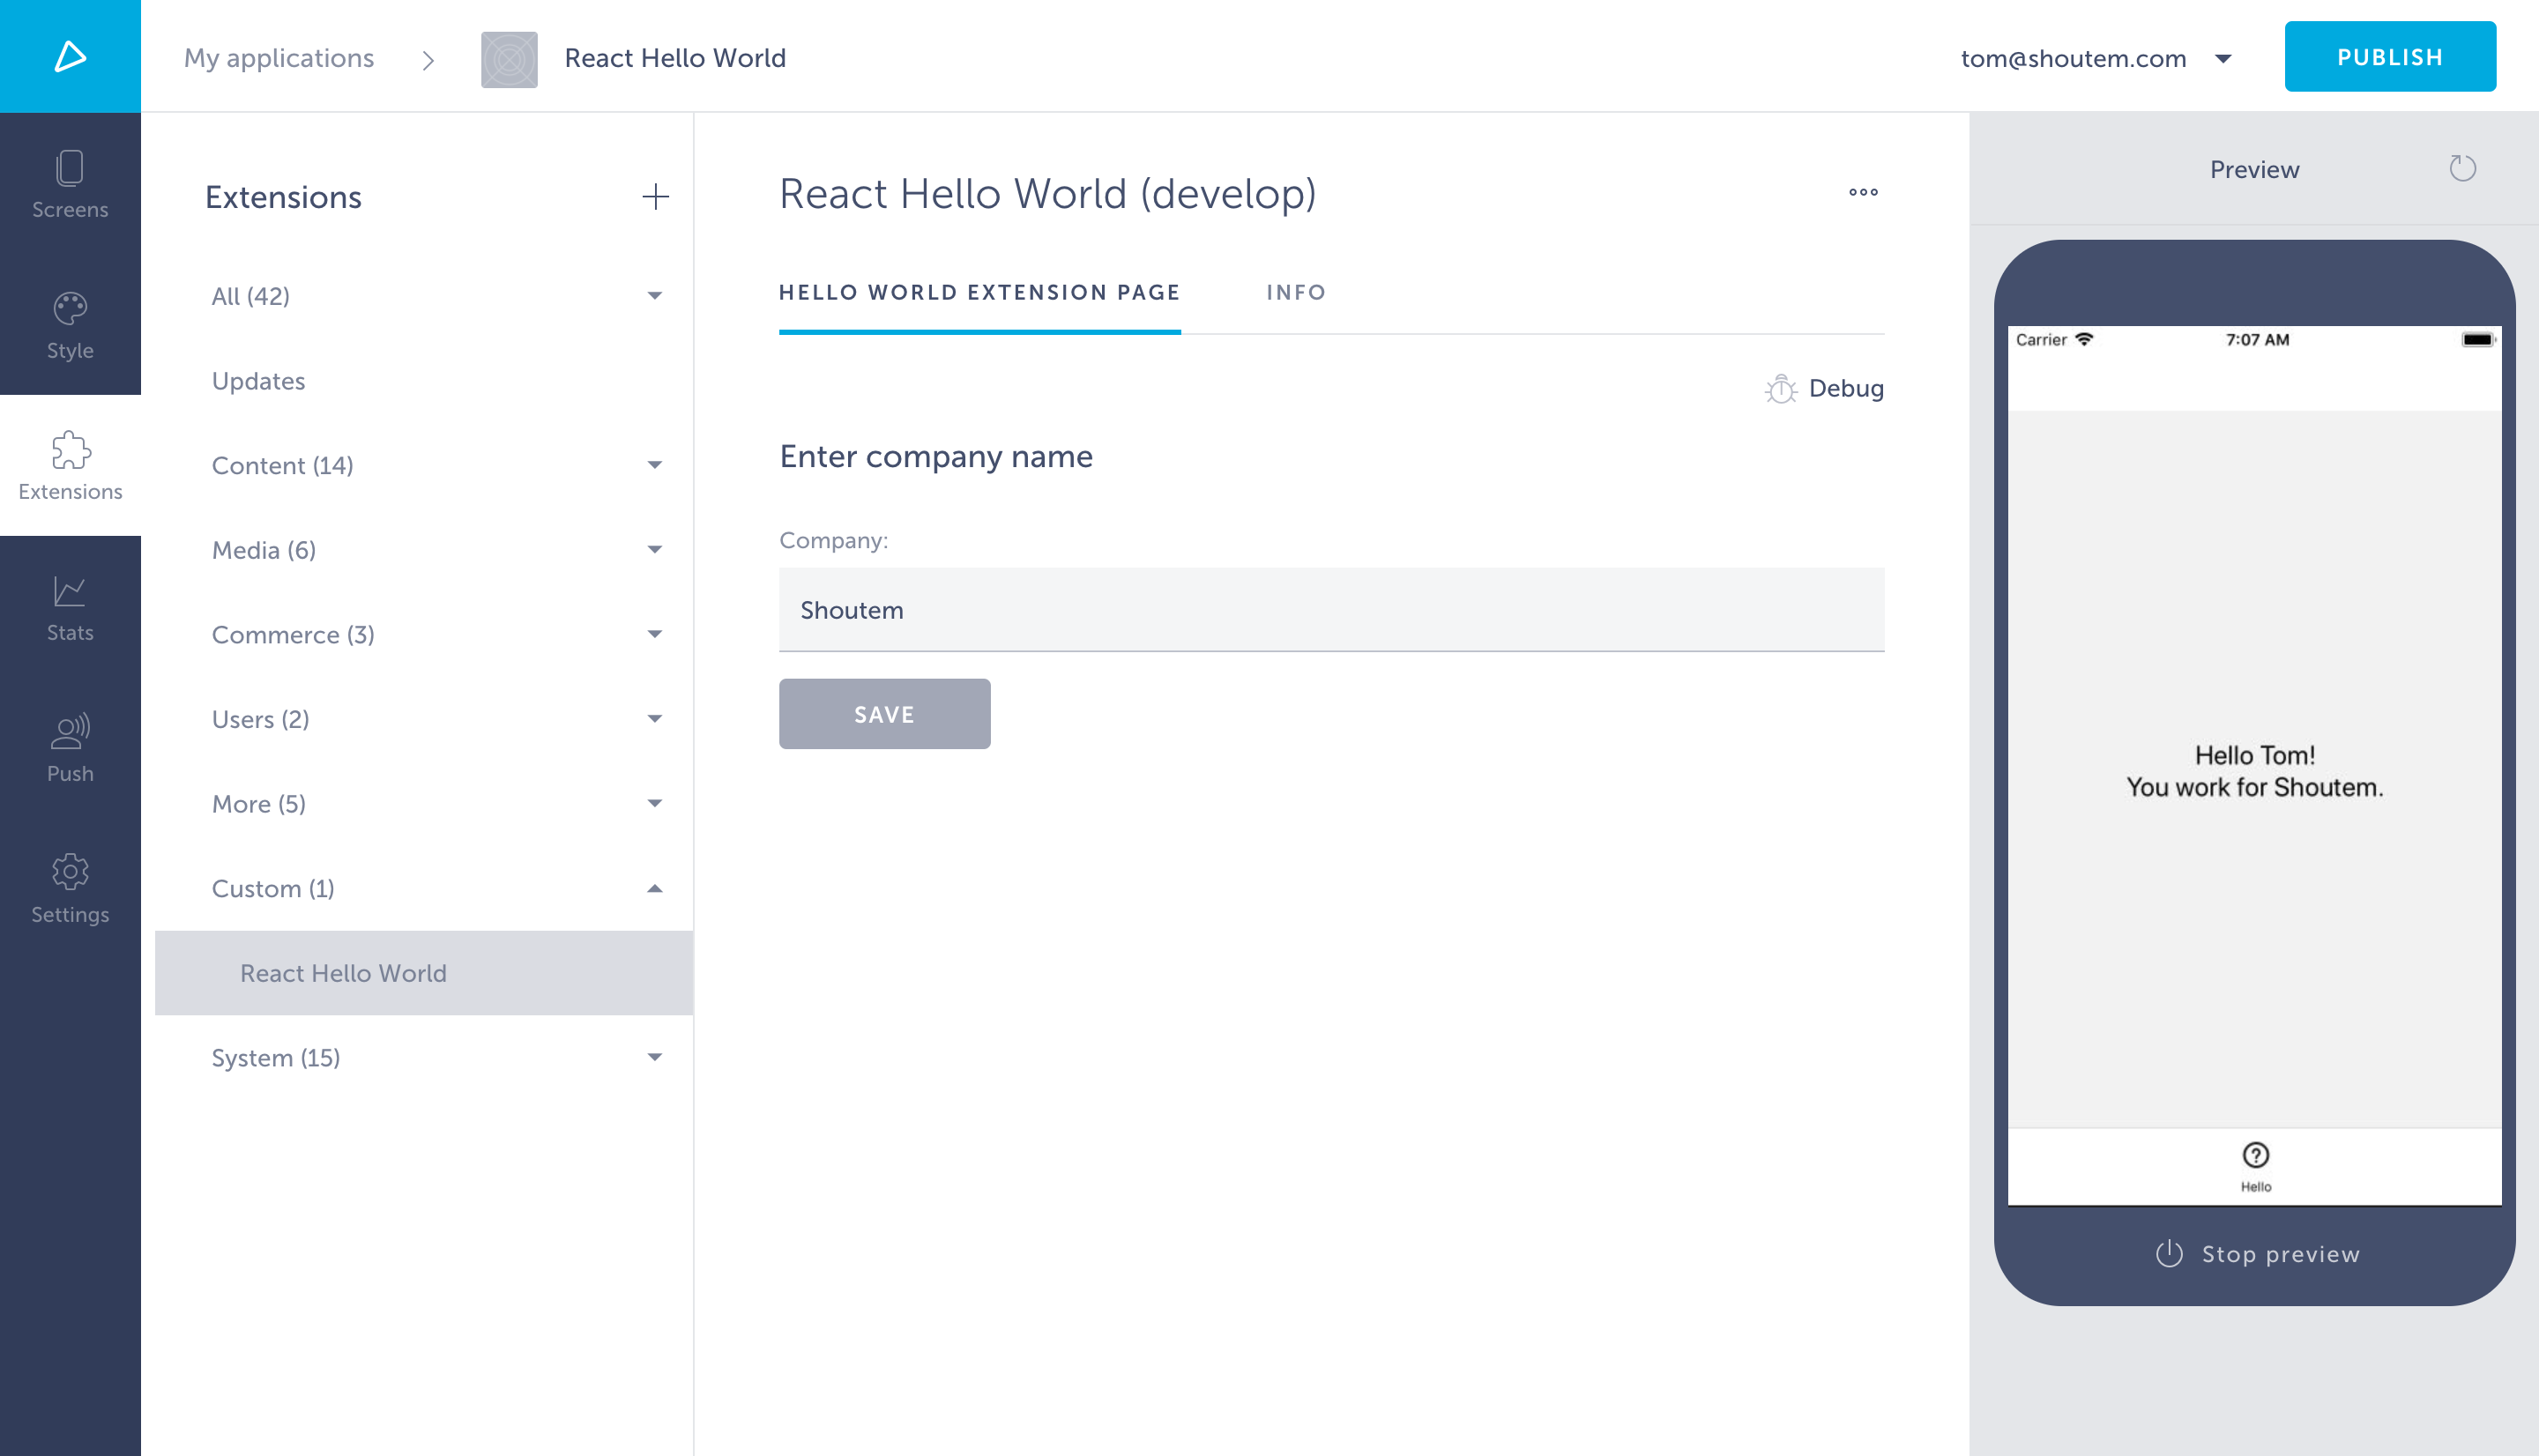
Extension settings pages provide you with settings that you can pass to every part of the extension, so in our simple use case, we’ll suppose the extension settings page lets the app owner determine which company the person being greeted is working for, as you can see from the input form.
The key difference between extension and shortcut settings pages is where they’re defined in the extension.json. They’re defined on the same level as shortcuts and pages. Let’s create an extension settings page.
$ shoutem page add
? Page type: react
? Page name: HelloWorldExtensionPage
? Page title: Hello World Extension Page
? This settings page controls setting sfor: the 'react-hello-world' extension
...
React settings page added to pages/hello-world-extension-page
The CLI added HelloWorldExtensionPage to the root level of extension.json, but let’s add a default value.
#file: extension.json
"settingsPages": [
  {
    "page": "@.HelloWorldExtensionPage",
    "title": "Hello World Extension Page"
  }
],
"settings": {
  "company": "Shoutem"
}
The template page generated is pretty much identical to the one generated for HelloWorldShortcutPage, referencing extension instead of shortcut throughout it and using company instead of greeting.
#file: server/src/pages/hello-world-extension-page.jsx
import {
  fetchExtension,
  updateExtensionSettings,
  getExtension,
} from '@shoutem/redux-api-sdk';
#file: server/src/pages/hello-world-extension-page.jsx
<FormGroup>
  <h3>Enter company name</h3>
  <ControlLabel>Company:</ControlLabel>
  <FormControl
    type="text"
    className="form-control"
    value={company}
    onChange={this.handleTextChange}
  />
</FormGroup>
In order to access the extension settings from the actual app, we have to connect to the redux state, which means we have to add certain imports as well as use mapStateToProps. This is also included in the boilerplate.
function mapStateToProps(state, ownProps) {
  const { extensionName } = ownProps;

  return {
    extension: getExtension(state, extensionName),
  };
}

function mapDispatchToProps(dispatch, ownProps) {
  const { extensionName } = ownProps;

  return {
    fetchExtension: () => dispatch(fetchExtension(extensionName)),
    updateExtensionSettings: (extension, settings) => (
      dispatch(updateExtensionSettings(extension, settings))
    ),
  };
}

export default connect(mapStateToProps, mapDispatchToProps)(HelloWorldExtensionPage);
Let’s retrieve that company value from the redux store and use it in our Hello screen.
#file: app/screens/Hello.js
import React, {
  Component
} from 'react';

import {
  StyleSheet,
  Text,
  View
} from 'react-native';

import { connect } from 'react-redux';
import { connectStyle } from '@shoutem/theme';
import _ from 'lodash';
import { getExtensionSettings } from 'shoutem.application';
import { ext } from '../const';

export class Greeting extends Component {
  render() {
    const { shortcut, company } = this.props;
    const { greeting } = shortcut.settings;

    return (
      <View style={styles.container}>
        <Text style={styles.text}>Hello {greeting}!</Text>
        <Text style={styles.text}>You work for {company}.</Text>
      </View>
    );
  }
}

const styles = StyleSheet.create({
  container: {
    flex: 1,
    justifyContent: 'center',
    alignItems: 'center',
  },
  text: {
    fontSize: 20,
  },
});

export const mapStateToProps = (state) => {
  const extensionSettings = getExtensionSettings(state, ext());
  const company = _.get(extensionSettings, 'company');

  return {
    company
  };
};

export default connect(mapStateToProps, undefined)(
  connectStyle(ext('Greeting'))(Greeting),
);
Finally, let’s push the new version of our react-hello-world extension that we’ve made to Shoutem and see our extension settings page in action.
$ shoutem push
Uploading React Hello World extension to Shoutem...
Success!
So what’s the purpose of extension settings pages as opposed to shortcut? Well, in our simple example, we made an extension where the app owner can define which company he’s addressing and then make each Screen he adds on the Builder greet a unique employee. Each screen added will address the company defined in the Extension settings pages, while the app owner can choose which employee each screen greets.